http://jqueryui.com/demos/accordion/#default

http://docs.jquery.com/UI/Accordion#overview

http://jquery.bassistance.de/accordion/demo/

'JS > jquery' 카테고리의 다른 글

셀렉터  (0) 2012.01.17
폼관련  (0) 2012.01.17
기초함수  (0) 2012.01.17
jQuery의 기초  (0) 2012.01.17
유용한 JQUERY site  (0) 2012.01.17
JQUERY 플러그인  (0) 2012.01.17
Lazy Load Plugin for jQuery  (0) 2012.01.16
jQuery Fade In Scroll To Top Button With Smooth Scroll For Blogger  (0) 2012.01.16
Sticky Sidebar jQuery plugin  (0) 2012.01.16
jQuery를 이용해 스크롤바 따라다니는 레이어 만들기(IE6,IE7,IE8,크롬,사파리,파폭)  (0) 2012.01.16
by Anna 안나 2012. 1. 17. 19:14
1. 위치 기반 셀렉터

//[모든 짝수번째<p>엘리먼트를 선택한다.]
$("p:even");

//[모든 홀수 번째<p>엘리먼트를 선택한다.]
$("p:odd");

//[(첫|마지막)번째<p>엘리먼트를 선택한다.]
$("p:(first|last)");

//(첫|마지막)번째 자식 엘리먼트. 각 리스트의 (첫|마지막)번째의 아이템을 반환한다.
$("li:(first-child|last-child)")

//형제가 없는 모든 엘리먼트를 반환한다.
$("only-child")

//[모든 테이블에서 첫째행을 선택한다.] => n값은 1부터 시작
$("table tr:n-child(1)");

//[모든 테이블에서 (짝수 | 홀수)행을 선택한다.]
$("table tr:nth-child(even|odd)");

//[n번째로 일치하는 엘리먼트] => n값은 0부터 시작
$("eq(n)");

//[n번째(포함하지 않음) 이후로 일치하는 엘리먼트] => n값은 0부터 시작
$("gt(n)");

//[n번재(포함하지 않음) 이전의 일치하는 엘리먼트] => n값은 0부터 시작
$("lt(n)");


2.CSS 셀렉터

//[<body>의 바로 아래 자식인 <div> 엘리먼트를 선택한다.]
$("body > div");

//[확장자 pdf 파일의 링크를 선택한다.]
$("a[href$=pdf]");

//[http://로 시작하는 링크를 선택한다.]
$("a[href^=http://]");

//[<body>의 바로 아래 자식이면서 링크를 포함하는 <div>엘리먼트를 선택한다.]
$("body > div:has(a)");

//[속성값이 임의의 문자열을 포함하는 엘리먼트를 찾아오라]
$("a[href*=jquery.com]");

//[선택자 id someElement 에 html을 삽입한다.]
$("#someElement").html("엘리먼트에 텍스트를 추가한다.");

//[다수의 엘리먼트와 일치하는 셀렉터에 html 추가한다.]
$("div.fillMeIn").html("노드 그룹에 텍스트를 추가한다.");

//[모든 엘리먼트와 일치한다.]
$("*");

//[E 엘리먼트 형제로 바로 다음에 나오는 엘리먼트 F와일치]
$("E+F");

//[E 엘리먼트 형제로 다음에 나오는 엘리먼트 F와일치]
$("E~F");


3. 필터 셀렉터

//[애니메이션이 적용되고 있는 엘리먼트]
$(":animated");

//[모든 버튼을 선택한다.]
$(":button");

//[모든 체크박스를 선택한다.]
$(":checkbox");

//[선택된 체크박스나 라디오 버튼을 선택한다.]
$(":checked");

//[텍스트 foo를 포함 하는 엘리먼트만을 선택한다.]
$(":contains(foo)");

//[비활성된 모든 폼 엘리먼트를 선택한다.]
$(":disabled");

//[활성된 모든 폼 엘리먼트를 선택한다.]
$(":enabled");

//[모든 파일 엘리먼트를 선택한다.]
$(":file");

//[헤더 엘리먼트를 선택한다. <h1>~<h6>]
$(":header");

//[감춰진 엘리먼트를 선택한다.]
$(":hidden");

//[폼 이미지를 선택한다.]
$(":image");

//[폼 엘리먼트를 선택한다.(input,select,textarea,button)]
$(":input");

//[필터의 값을 반대로 설정한다.]
$(":not(filter)");

//[빈엘리먼트를 제외하고 텍스트도 포함해서 자식 엘리먼틀 가지는 부모 엘리먼트를 선택한다.]
$(":parent");

//[패스워드 엘리먼트를 선택한다.]
$(":password");

//[라디오 엘리먼트를 선택한다.]
$(":radio");

//[리셋버튼을 선택한다.]
$(":reset");

//[선택된 엘리먼트를 선택한다.]
$(":selected");

//[전송버튼을 선택한다.]
$(":submit");

//[텍스트 엘리먼트 선택한다.(input type=text)]
$(":text");

//[보이는 엘리먼트를 선택한다.]
$(":visible");
by Anna 안나 2012. 1. 17. 12:32
1.checkbox


-체크박스 체크 여부 : $('#checkboxid').is(":checked") //체크되었으면 true, 아니면 false를 반환
- 선택된 값 : $("input[name=objname]:checked").val()
- 선택 : $("input[name=objname]").filter("input[value=objvalue]").attr("checked", "checked");
- 해제 : $("input[name=objname]").filter("input[value=objvalue]").attr("checked", "");
- 선택된 갯수: $("input[name=objname]:checkbox:checked").length


2. select box


-value 값 가져오기 : var select_value = $("selectboxid > option:selected").val();
-값 설정 하기 : $("selectboxid > option[value=설정값]").attr("selected", "true");


3.팝업창에서 부모창에 값 셋팅하기.

$(opener.document).find('#sendMailYN').val( "1" );

팝업창에서 부모창의 input 라디오 타입을 검색하면서 값이 2일때 체크해준다.


4. radio 라디오버튼에서 선택된 값을 찾는 방법이다.. 첫번째 방법

     //라디오 버튼의이름이 "rdobtn"인것 중 선택되어진 항목의 값을 가져온다.
   -  var selectedValue = $('input:radio[name=rdobtn]:checked').val() ;

또는
   -  var selectedValue = $('input:radio[id=rdobtn]:checked').val() ;


두번째 방법

var selectedValue = "";
 var radios = $("input:radio");  //타입이 radio인 항목을 찾는다.
 for(var i = 0; i < radios.length;i++) //
 {
      if(radios[i].checked == true) //라디오 버튼중 선택되어진 항목의 값을 가져온다.
      {
          selectedValue = $(radios[i]).val() ;
      }
 }


by Anna 안나 2012. 1. 17. 12:32

1. jQuery함수 $(...) 

jQuery 함수 $(...)

jQuery(expression,context)

CSS 셀렉터를 받아 매치된 엘리먼트 집합의 jQuery 객체를 리턴한다.


예제1

div 엘리먼트 안의 모든 p 엘리먼트를 추출하여 테두리를 붙인다.

$("div > p").css("border", "1px solid gray");

예제2

document 첫번째 form 안에 있는 모든 input 태그 타입이 radio 인 것을 추출한다.

$("input:radio", document.forms[0]);

예제3

AJAX 응답으로부터 받은 XML에서 모든 div를 추출한다

$("div", xml.responseXML);

jQuery(html)

예제1

div를 비롯한 콘텐츠를 동적으로 생성하고 body에 추가한다.

$("<div><p>Hello</p></div>").appendTo("body")

예제2

input 요소를 type 요소없이 만들 수 없다. 

이것은 Microsoft의 read / write - once 규칙에 따른 것으로, 자세한 내용은 MSDN을 참조한다.

// IE에서 작동하지 않음

$("<input/>").attr("type", "checkbox");

// IE에서 작동

$("<input type='checkbox'/>");

jQuery(elements)

이 함수의 인수는 XML Documents와 Window 개체와 같이 DOM 엘리먼트가 아닌것도 받아들인다.

예제1

body의 배경색을 바꾼다 (css 메서드는 DOM Element에 없는 jQuery개체이다)

$(document.body).css( "background", "black" );

예제2

myForm 내의 모든 엘리먼트를 표시하지 않는다 ( 배열에는 모든 것을 한꺼번에 표시하지 않는 hide 함수는 존재하지 않는다)

$(myForm.elements).hide()

jQuery(callback)

$(document).ready()의 약어

DOM Document로드가 끝난 때 바인딩 해 놓은 함수가 실행된다. 

이 함수는 $ (document) ready ()와 같게 동작한다.

이 함수는 기술 적으로는 다른 $ () 함수와 마찬가지로 모두 가능하다, 쓰임새는 없다.

예제1

DOM 준비가 가능하면 작업을 수행한다.

$(function(){

  // Document is ready

});

예제2

$별칭을 사용하여 jQuery 코드가 안정적으로 동작하므로 전역 변수에 의지하지 않고 인수 $를 기술하도록한다. 

jQuery(function($) {

  // Your code using failsafe $ alias here...

});


2. jQuery Object 조작

each(callback)

일치한 전체의 Element에 대하여 함수를 실행한다.

이것은 일치하는 Element를 찾을 때 마다 1번씩 매번 함수가 실행되는 것을 의미한다.

함수에서 this 포인터는 각 Element를 의미한다.

예제1

div를 찾아서 color 프로퍼티를 변경한다.

  1. $(document.body).click(function () {
        $("div").each(function (i) {
  2.         if (this.style.color != "blue") {
  3.           this.style.color = "blue";
  4.         } else {
  5.           this.style.color = "";
  6.         }
  7.     });
  8. });

전체소스 : each_1.html

예제2

DOM Element 대신 jQuery  오브젝트를 사용하는 경우 $(this)를 기술

  1. $("span").click(function () {
  2.   $("li").each(function(){
  3.     $(this).toggleClass("example");
  4.   });
  5. });

전체소스: each_2.html


예제3

id가 stop인 div가 발견된 시점에 false를 반환하여 루프를 빠져나온다.

  1. $("button").click(function () {
  2.   $("div").each(function (index, domEle) {
  3.     // domEle == this
  4.     $(domEle).css("backgroundColor", "yellow"); 
  5.     if ($(this).is("#stop")) {
  6.       $("span").text("Stopped at div index #" + index);
  7.       return false;
  8.     }
  9.   });
  10. });

전체소스: each_3.html

eq(position)

0 부터 length-1 가운데 일치하는 위치에 있는 엘리먼트만 찾아온다.

예제1

P 태그 집합중 위치가 2번째인 Element색상을 바꾼다.

  1. $("p").eq(1).css("color","red")

전체소스:  eq_1.html

get()

jQuery 오브젝트가 가지고 있는 Element 전체를 배열 형태로 반환한다.

jQuery 객체가 아니라 DOM Element를 조작하는데 도움이된다.

예제1

div 요소를 get() 배열로 반환한다. 그리고 reverse() 내장함수를 이용하여 배열을 반전 표시한다.


  1. function disp(divs) {
  2.   var a = [];
  3.   for (var i = 0; i < divs.length; i++) {
  4.     a.push(divs[i].innerHTML);
  5.   }
  6.   $("span").text(a.join(" "));
  7. }
  8. disp( $("div").get().reverse() );


전체소스:  get_1.html

get(index)

DOM Element의 집합으로부터 인덱스를 지정해 하나의 Element를 참조한다.

이것에 의해 jQuery 오브젝트일 필요가 없는 케이스로 특정의 DOM Element 그 자체를 조작하는 것이 가능.

예제1


  1. $("*", document.body).click(function (e) {
  2.   e.stopPropagation();
  3.   var domEl = $(this).get(0);
  4.   $("span:first").text("Clicked on - " + domEl.tagName);
  5. });


전체소스:  get_index_1.html


index(subject)

jQuery 오브젝트 내에서 인수로 지정된 Element 인덱스를 리턴한다.

만약 jQuery 오브젝트 내에 존재하지 않으면 -1을 리턴한다.

예제1

페이지의 div의 인덱스를 리턴한다.


  1. $("div").click(function () {
  2.   // this is the dom element clicked
  3.   var index = $("div").index(this);
  4.   $("span").text("That was div index #" + index);
  5. });


전체소스:  index.html


length()

jQuery 오브젝트 Element 수를  유지한다. size 함수와 같은 값을 리턴

예제1

div를 카운팅하고 div를 추가한다.


  1. $(document.body).click(function () {
  2.   $(document.body).append($("<div>"));
  3.   var n = $("div").length;
  4.   $("span").text("There are " + n + " divs." +
  5.                  "Click to add more.");
  6. }).trigger('click'); // trigger the click to start

전체소스:  length.html

[출처] jQuery 함수 $(...)|작성자 하늘호수


http://blog.naver.com/ctlim2?Redirect=Log&logNo=50086952309
by Anna 안나 2012. 1. 17. 12:30
$(document).ready(function() {
(이곳에 시연하고자 하는 jquery 코드가 들어감.)
});
 
위의 코드가 jQuery를 시작하는 기본 코드가 됩니다. 
Javascript 에서의 window.onload = function() { } ;

부분과 비슷합니다만, 다른점은 자바스크립트의 onload가 모든 이미지들의 로딩이 마쳐야 시연되는 반면에, jQuery는 이미지가 로딩되지 않아도 시연이 됩니다.


페이지가 전부 다운로드 된다음에 실행

$(window).load(function() {
     해당 기능
});

HTML이 준비가 되면 실행

$(document).ready(function() {
     해당 기능
});
위 코드는  (document).ready를 생략해
$(function() {
     해당 기능
});
로도 사용가능합니다.


밑에 그림은 jQuery를 사용하기 위한 기초적인 형식입니다.


실제로 우리가 사용하는 코드는 윗그림의 빨강색 네모안에 들어가게 됩니다.
코드를 쓰시는 분에 따라서는 이렇게 눈에 잘보이게 정리하시지 않고 한줄에 몰아서 쓰시기도 합니다.
(잘 보시면 알겠지만 사실은 명령코드 하나입니다.)


빨강네모안에 들어갈 우리가 사용하는 코드는 밑에 그림과 같은 형식을 가집니다.

위의 코드에서 붉은 색 부분을 선택자(Selector) 라고 합니다. 즉, 구현할 대상에 되는 녀석을 선택하는 것이죠. 사용 방법은 $() 의 괄호안에 대상이 되는 녀석을 선택하는것입니다. jQuery가 좋은것이 선택자 개념이 CSS와 거의 흡사하기 때문에 쉽게 사용할수 있습니다.

'JS > jquery' 카테고리의 다른 글

Jquery Accordion 관련 링크  (0) 2012.01.17
셀렉터  (0) 2012.01.17
폼관련  (0) 2012.01.17
기초함수  (0) 2012.01.17
유용한 JQUERY site  (0) 2012.01.17
JQUERY 플러그인  (0) 2012.01.17
Lazy Load Plugin for jQuery  (0) 2012.01.16
jQuery Fade In Scroll To Top Button With Smooth Scroll For Blogger  (0) 2012.01.16
Sticky Sidebar jQuery plugin  (0) 2012.01.16
jQuery를 이용해 스크롤바 따라다니는 레이어 만들기(IE6,IE7,IE8,크롬,사파리,파폭)  (0) 2012.01.16
by Anna 안나 2012. 1. 17. 12:29

'JS > jquery' 카테고리의 다른 글

Jquery Accordion 관련 링크  (0) 2012.01.17
셀렉터  (0) 2012.01.17
폼관련  (0) 2012.01.17
기초함수  (0) 2012.01.17
jQuery의 기초  (0) 2012.01.17
JQUERY 플러그인  (0) 2012.01.17
Lazy Load Plugin for jQuery  (0) 2012.01.16
jQuery Fade In Scroll To Top Button With Smooth Scroll For Blogger  (0) 2012.01.16
Sticky Sidebar jQuery plugin  (0) 2012.01.16
jQuery를 이용해 스크롤바 따라다니는 레이어 만들기(IE6,IE7,IE8,크롬,사파리,파폭)  (0) 2012.01.16
by Anna 안나 2012. 1. 17. 12:28
http://www.trirand.com/blog/?page_id=6


그리드 (*) : 전체 페이징을 하지 않는 Ajax 게시판
http://www.reconstrukt.com/ingrid/example2.html


팬시박스 (**) : 이미지 팝업창에 모달효과 약간의 에니메이션이 들어감.
http://fancy.klade.lv/ (****)

예제 : http://fancy.klade.lv/example


jQuery Lightbox Plugin (balupton edition) (**) : 이미지 모달 팝업
http://www.balupton.com/sandbox/jquery_lightbox/


imagebox : 이미지 모달 팝업
http://www.intelliance.fr/jquery/imagebox/


이미지 회전 :  이미지의 회전이 가능하게 한다.

http://www.piksite.com/mRotate/mRotate.html


jQuery sliding gallery demo : 이미지 애니메이션 슬라이드
http://phplug.net/components/javascript/jquery-gallery.html


이미지 슬라이딩 : 좌 우로 움직임
http://www.maxb.net/scripts/ycodaslider-2.0/include/demo/#10


이미지 공간감 효과 (***)  :  여러 이미지를 레이어 겹쳐 놓음으로써 3D 효과를 준다.

http://webdev.stephband.info/parallax.html


디자이너를 위한 jquery (**) : 태그 조작과 에니메이션 효과와 관련된 사이트
http://www.webdesignerwall.com/demo/jquery/(****)


AutoScroll (*) : 컨 트롤 키 누른 채로 mouse 움직였을 때, 자동 스크롤이 가능하게끔
http://jdsharp.us/jQuery/plugins/AutoScroll/demo.php (****)


drag and drop (*) : 드래그 드랍 예제
http://host.sonspring.com/dragdrop/ (***)


JQuery 예제 모음 사이트 (*****)

http://www.ajaxrain.com/tag?tag=jquery


컬럭 Picker (****)  :  PhotoShop의 색 선택 기능이 가능.
http://www.intelliance.fr/jquery/color_picker/


jQuery MultiSelect (**) : custom 셀렉트 박스, 셀렉트 박스에 체크박스가 추가 되어 여러개를 선택 가능한 박스.
http://abeautifulsite.net/notebook_files/62/demo/jqueryMultiSelect.html


"jQuery checkbox v.1.0.0" demo (**)  : custom 디자인 체크박스
http://widowmaker.kiev.ua/checkbox/


jQuery Treeview Plugin Demo (**) : 트리 컨트롤러 1

http://jquery.bassistance.de/treeview/demo/


jQuery File Tree Demo (***) : JQuery 트리 컨트롤로 2
http://abeautifulsite.net/notebook_files/58/demo/


jQuery columnManager plugin (*) : 테이블의 컬럼을 추가 삭제등의 기능 제공
http://p.sohei.org/stuff/jquery/columnmanager/demo/demo.html


jQuery AIR (***) : ajax를 이용한 항공 좌석 예약.
http://www.digital-web.com/extras/jquery_crash_course/


Masked Input Plugin (**) : 입력상자에 exel과 같은 서식 적용.
http://digitalbush.com/projects/masked-input-plugin


Watermark Input Plugin (*): 입력상자에 워터마크 표시
http://digitalbush.com/projects/watermark-input-plugin


ClockPick (***): 입력상자에 시간을 선택해서 넣을 수 있다.
http://www.oakcitygraphics.com/jquery/clockpick/trunk/ClockPick.cfm


chart : JQuery를 이용한 차트
http://www.reach1to1.com/sandbox/jquery/jqchart/


달력
http://tedserbinski.com/jcalendar/index.html#demo


3D로테이션 : 글자들이 xy 좌표에서 3D효과로 회전함.
http://www.willjessup.com/sandbox/jquery/rotator/rotator.html


스크롤중 데이터가져오기 :
http://www.webresourcesdepot.com/dnspinger/
http://www.webresourcesdepot.com/load-content-while-scrolling-with-jquery/


Query Flash Plugin - Basic Example : flash 삽입 플러그인
http://jquery.lukelutman.com/plugins/flash/example-basic.html


jquery combobox demo : custom 콤보박스 ie 7.0으로 보면 깨져나온다.

http://jquery.sanchezsalvador.com/samples/example.htm


scrollable table : 테이블에 스크롤바가 붙어있다-_-;;
http://www.webtoolkit.info/demo/jquery/scrollable/demo.html


accordion-madness
http://www.learningjquery.com/2007/03/accordion-madness


jQuery Multimedia Portfolio
http://www.openstudio.fr/jquery/


체크박스 이동
http://sanisoft-demo.com/jquery/plugins/shiftcheckbox/demo.html


위지윅에디터
http://projects.bundleweb.com.ar/jWYSIWYG/


크랍
http://remysharp.com/2007/03/19/a-few-more-jquery-plugins-crop-labelover-and-pluck/#crop


슬라이딩 퍼즐
http://www.bennadel.com/blog/1009-jQuery-Demo-Creating-A-Sliding-Image-Puzzle-Plug-In.htm


날짜픽업
http://kelvinluck.com/assets/jquery/datePicker/v2/demo/


레이팅
http://php.scripts.psu.edu/rja171/widgets/rating.php


JQuery Curvy Corners Demo page
http://blue-anvil.com/jquerycurvycorners/test.html


http://www.mind-projects.it/blog/jqzoom_v10


LavaLamp for jQuery lovers!
http://gmarwaha.com/blog/?cat=8


컬러
http://www.jnathanson.com/blog/client/jquery/heatcolor/index.cfm#examples


비쥬얼 쿼리
http://visualjquery.com/1.1.2.html


jQuery "Highlight" Demo
http://www.keyframesandcode.com/resources/javascript/jQuery/demos/highlight-demo.html


Hot Key Testing
http://jshotkeys.googlepages.com/test-static.html


accordion menu
http://www.i-marco.nl/weblog/jquery-accordion-menu-redux/


jQuery easyThumb
http://www.hverven.net/div/easyThumb/


갤러리
http://www.flyerstop.ca/ui/apps/gallery_advanced/


thickbox
http://jquery.com/demo/thickbox/


마우스휠 플러그인
http://www.ogonek.net/mousewheel/jquery-demo.html
http://www.ogonek.net/mousewheel/demo.html

휴먼메세지
http://binarybonsai.com/misc/humanmsg/


jQuery - LinkedSelect
http://www.msxhost.com/jquery/linked-selects/json/


jQuery &#187; iFrame Sizing
http://host.sonspring.com/iframe/


jQuery for Designers - Ajax Form Validation Example
http://jqueryfordesigners.com/demo/ajax-validation.php


폰트크기 바꾸기
http://www.lllcolor.com/jQuery/demo/demo01b.html


dimension
http://brandonaaron.net/docs/dimensions/#code-samples


portlet 데모
http://www.rymix.co.uk/jquery/d15/sortables2.html


FX데모
http://magalies.net/downloads/Jquery/Interface%20examples/demos/ifx.html#pulsate-fx


오픈윈도우
http://magalies.net/downloads/Jquery/Interface%20examples/demos/windows.html


JQuery tricks: using Greybox + form plugin for a modal dialog box
http://corky.net/dotan/programming/jquery.dialog/dialog-demo.html


FaceBoox style autosuggest with jQuery
http://web2ajax.fr/examples/facebook_searchengine/


Auto-Growing Textarea Demo
http://www.aclevercookie.com/demos/autogrow_textarea.html


jQuery Helper for Komodo Media CSS Star Rater (Redux)
http://www.m3nt0r.de/devel/raterDemo/


에디터
http://avidansoft.com/dsrte/


jQuery Keyboard Navigation Plugin
http://amountaintop.com/project/keynav/


http://jqueryfordesigners.com/demo/tabs.html


jQuery AccessKey Demo
http://methvin.com/jquery/jq-access.html


Semi-transparent rollover effect using jQuery
http://coderseye.com/files/demos/pngrollover/index.html


Revealing Photo Slider
http://css-tricks.com/examples/RevealingPhotoSlider/


Simple jQuery form validation
http://www.willjessup.com/sandbox/jquery/form_validator/form_validate.html


after callback demo
http://jsdesigning.com/gal/gal.php?top=10&id_pic=9&id_album=2


갤러리
http://devkick.com/lab/galleria/demo_01.htm#img/ladybug.jpg


SWF Upload
http://www.alexandremagno.net/blog/wp-content/uploads/swfupload/index.htm

jQuery gradient - Visual Test
http://brandonaaron.net/jquery/plugins/gradient/test/


tEditable :: In place table editing for jQuery
http://joshhundley.com/teditable/index.html


sort
http://interface.eyecon.ro/demos/sort.html


http://geeknation.blinklist.com/tag/jQuery/


http://www.nalanta.com/node/7
http://www.noupe.com/jquery/50-amazing-jquery-examples-part1.html
http://www.blinklist.com/mungkey/jquery/


http://geekswithblogs.net/AzamSharp/archive/2008/02/21/119882.aspx


http://www.learningjquery.com/2006/12/multiple-fancy-drop-caps

http://www.trirand.com/blog/?page_id=5


http://people.iola.dk/olau/flot/examples/selection.html(챠 트 선택)

http://www.mootools.net/dragdrop/

http://plugins.jquery.com/project/Plugins/category/21


http://mohamedshaiful.googlepages.com/add_remove_form.htm

http://www.chazzuka.com/Portofolio/


http://dev.jquery.com/view/tags/ui/1.5b2/demos/ui.sortable.html


http://hooney.net/code/2007/08/UnobtrusiveTabNav/tabNav03.html

http://jqueryfordesigners.com/coda-slider-effect/

http://benjaminsterling.com/jquery-jqgalview-photo-gallery/

http://www.mind-projects.it/blog/jqzoom_v10


http://www.reach1to1.com/sandbox/jquery/jqchart/

http://jquery.lukelutman.com/plugins/flash/

http://leandrovieira.com/projects/jquery/lightbox/

http://marcgrabanski.com/code/ui-datepicker/


http://www.noupe.com/ajax/37-more-shocking-jquery-plugins.html

http://www.webdesignerwall.com/demo/jquery/


http://www.gcmingati.net/wordpress/wp-content/lab/jquery/imagestrip/imageslide-plugin.html


http://cssglobe.com/post/1695/easiest-tooltip-and-image-preview-using-jquery


http://www.gcmingati.net/wordpress/wp-content/lab/jquery/imagestrip/imageslide-plugin.html


http://jquery.glyphix.com/


http://www.balupton.com/sandbox/jquery_lightbox/


챠트
http://www.filamentgroup.com/lab/creating_accessible_charts_using_canvas_and_jquery/


http://sorgalla.com/projects/jcarousel/

http://designreviver.com/tutorials/jquery-examples-horizontal-accordion

http://host.sonspring.com/portlets/

http://www.webdesignerwall.com/tutorials/jquery-tutorials-for-designers/

http://www.digital-web.com/extras/jquery_crash_course/


http://www.blinklist.com/codearachnid/jquery/

http://drupalmodules.com/module/image-enhanced-scaling

http://www.ajaxdaddy.com/store


http://www.ajaxrain.com/tag.php?tag=image&page=2(모음)
http://www.spicyexpress.net/general/jquerry-at-it-best- downloadable-jquerry-plugins-and-widgets-for-you-2/(예제모음)

http://mike.teczno.com/giant/pan/(pan)


출처 : 웃대가리블로그 - [추천]Jquery 링크 모음 - http://urin79.com/zb/utdae/783559
by 디케

http://defle.nayana.com/board/view.php?bbs_code=goodsite&ss[cat]=122&bd_num=1042
by Anna 안나 2012. 1. 17. 12:27
Lazy Load is a jQuery plugin written in JavaScript. It delays loading of images in long web pages. Images outside of viewport (visible part of web page) wont be loaded before user scrolls to them. This is opposite of image preloading.

Using Lazy Load on long web pages containing many large images makes the page load faster. Browser will be in ready state after loading visible images. In some cases it can also help to reduce server load.

Lazy Load is inspired by YUI ImageLoader Utility by Matt Mlinac.

For those in hurry there are several demo pages available: basic options, with fadein effect, noscript fallback, horizontal scrolling, horizontal scrolling inside container, vertical scrolling inside container, page with gazillion images and load images using timeout.

When checking the demos clear browser cache between each request. You can check what is actually loaded with developers console (Chrome and Safari), FireBug (Firefox) or HTTPHeaders (IE).

How to Use?

Lazy Load depends on jQuery. Include them both in end of your HTML code:

<script src="jquery.js" type="text/javascript"></script>
<script src="jquery.lazyload.js" type="text/javascript"></script>

You must alter your HTML code. Put the place holder image into src attribute. Demo pages use 1×1 pixel grey gif. URL of the real image must be put into data-original attribute. It is good idea to give Lazy Loaded image a specific class. This way you can easily control which images plugin is binded to.

<img class="lazy" src="img/grey.gif" data-original="img/example.jpg"  width="640" heigh="480">

then in your code do:

$("img.lazy").lazyload();

This causes all images of class lazy to be lazy loaded. See the basic options demo.

Fallback for Non JavaScript Browsers

Practically everyone has JavaScript enabled. However there are cases when you want to show the real images even if request come from client which does not support JavaScript. Google crawlers are one good candidate. Google crawlers do not execute JavaScript but also seem to ignore noscript content. To degrade gracefully when JavaScript is not enabled you can include the real image tag inside <noscript> block.

<img class="lazy" src="img/grey.gif" data-original="img/example.jpg"  width="640" heigh="480">
<noscript><img src="img/example.jpg" width="640" heigh="480"></noscript>

To prevent both placeholder and the real image showing at the same time hide the place holder with css.

.lazy {
  display: none;
}

For JavaScript enabled browser you must enable displaying the placeholders when documents loads. This can be done at the same time when initializing the plugin.

$("img.lazy").show().lazyload();

All this is optional can should be done only if you want the plugin to degrade gracefully.

Setting Sensitivity

By default images are loaded when they appear on the screen. If you want images to load earlier you can set threshold parameter. Setting threshold to 200 causes image to load 200 pixels before it is visible.

$("img.lazy").lazyload({ threshold : 200 });

Event to Trigger Loading

Event can be any jQuery event such as click or mouseover. You can also use your own custom events such as sporty or foobar. Default is to wait until user scrolls down and image appears on the window. To prevent all images to load until their placeholder image is clicked you could do:

$("img.lazy").lazyload({ 
    event : "click"
});

Using Effects

By default plugin waits for image to fully load and calls show() to show it. You can use any effect you want. Following code uses fadeIn effect. Check how it works at effect demo page.

$("img.lazy").lazyload({ 
    effect : "fadeIn"
});

Images Inside Container

You can also use plugin for images inside scrolling container, such as div with scrollbar. Just pass the container as jQuery object. There is a demo for horizontal and vertical container.

#container {
    height: 600px;
    overflow: scroll;
}
$("img.lazy").lazyload({         
     container: $("#container")
});

When Images Are Not Sequential

After scrolling page Lazy Load loops though unloaded images. In loop it checks if image has become visible. By default loop is stopped when first image below the fold (not visible) is found. This is based on following assumption. Order of images on page is same as order of images in HTML code. With some layouts assumption this might be wrong. You can control loading behaviour with failure_limit option.

$("img.lazy").lazyload({ 
    failure_limit : 10
});

Setting failure_limit to 10 causes plugin to stop searching for images to load after finding 10 images below the fold. If you have a funky layout set this number to something high.

Delayed Loading of Images

Not exactly feature of Lazy Load but it is also possible to delay loading of images. Following code waits for page to finish loading (not only HTML but also any visible images). Five seconds after page is finished, below the fold images are loaded automatically. You can also check the delayed loading demo.

$(function() {          
    $("img:below-the-fold").lazyload({
        event : "sporty"
    });
});
$(window).bind("load", function() { 
    var timeout = setTimeout(function() {$("img.lazy").trigger("sporty")}, 5000);
}); 

Load Invisible Images

There are cases when you have invisible images. For example when using plugin in together with a large filterable list of items that can have their visibility state changed dynamically. To improve performance Lazy Load ignores hidden images by default. If you want to load hidden images set skip_invisible to false.

$("img.lazy").lazyload({ 
    skip_invisible : false
});

Download

Latest source or minified. Plugin has been tested with Safari 5.1, Firefox 3.6, Firefox 7.0, Firefox 8.0 on OSX and Firefox 3.0, Chrome 14 and IE 8 on Windows and Safari 5.1 on iOS 5 both iPhone and iPad.

When asking a question please include an URL to example page where the problem occurs. If you have longer code examples please use pastie.org


http://www.appelsiini.net/projects/lazyload
by Anna 안나 2012. 1. 16. 14:50
In October last year i wrote a post with a Floating back to top button.Since then i have wanted to cover a more up to date back to top modern button.The popular option when it comes to scroll top buttons is to use jQuery for two reasons.Firstly with jQuery you can have the button hidden until the page is scrolled, secondly when clicked the page scrolls smoothly to the top instead of the direct jump a regular link would have.So that's exactly what i have in this tutorial.We will add a button that will only be visible when the reader starts scrolling and then when they click it the page slowly scrolls up easing into position at the top.For the button itself we us a sprite to create a hover effect sprites also keep the page load time down.

I recently started a blog in which i want to list the Best Design and Blogging posts, codes, tutorials and resources.On that blog i have the back to top button we cover in this post so we will use that as the demo.When you land on the page start to scroll and you will see the button in the bottom right corner.

Design and Blog

Looks and Works great lets add it to your blog.Credits to Matt Verone, Wordpress users can use the plugin here.

Smooth Scroll jQuery Back To Top Button


Remember Always Back Up Your Template Before You Make Changes - How To Back Up A Blogger Template

Step 1. In Your Blogger Dashboard Click Design > Edit Html

Design Edit Html Blogger

Step 2. Find the following piece of code in your blogs Html : (Click Ctrl and F for a search bar to help find the code - How To Find Code In Blogger Template Template)

]]></b:skin>

Step 3. Copy and Paste the following code Directly Above / Before ]]></b:skin>


#toTop {
display:none;
text-decoration:none;
position:fixed;
bottom:10px;
right:10px;
overflow:hidden;
width:51px;
height:51px;
border:none;
text-indent:-999px;
background:url(http://3.bp.blogspot.com/-ZaFk139_d7Q/ThWy56hQTtI/AAAAAAAAEtc/i7lYDE7NQRY/s1600/ui.totop.png) no-repeat left top;
}
#toTopHover {
background:url(http://3.bp.blogspot.com/-ZaFk139_d7Q/ThWy56hQTtI/AAAAAAAAEtc/i7lYDE7NQRY/s1600/ui.totop.png) no-repeat left -51px;
width:51px;
height:51px;
display:block;
overflow:hidden;
float:left;
opacity: 0;
-moz-opacity: 0;
filter:alpha(opacity=0);
}
#toTop:active, #toTop:focus {
outline:none;
}

Note - To move the button to the left of your blog change right:10px; to left:10px; .

Step 4. Find the following piece of code in your blogs Html : (Click Ctrl and F for a search bar to help find the code - How To Find Code In Blogger Template Template)

</head>

Step 5. Now Copy And Paste This Code Directly Above / Before </head>

Note - If you have previously added jQuery script to your template you can leave out the line in green.
<script src='http://code.jquery.com/jquery-1.6.1.min.js' type='text/javascript'/>
<script src='http://suyb.googlecode.com/files/jquery.easing.1.3.js' type='text/javascript'/>
<script src='http://suyb.googlecode.com/files/jquery.ui.totop.js' type='text/javascript'/>
<script type='text/javascript'>
$(document).ready(function() {
/*
var defaults = {
containerID: &#39;moccaUItoTop&#39;, // fading element id
containerHoverClass: &#39;moccaUIhover&#39;, // fading element hover class
scrollSpeed: 1200,
easingType: &#39;linear&#39;
};
*/

$().UItoTop({ easingType: &#39;easeOutQuart&#39; });

});
</script>

Step 6. Save your template.

That's it, You can check out your new back to top button after you Comment on and Share this post ! Make sure to check out more of our jQuery Tutorials and Blogger Tips.

Drop Your Comments And Questions Below.


http://www.spiceupyourblog.com/2011/07/jquery-scroll-to-top-button-smooth.html
by Anna 안나 2012. 1. 16. 14:45

This jQuery plugin allows you to set a number of sidebar or floating boxes that follow the user down the page as they scroll. The plugin uses absolute positioning calculated from the original css and offset to either the closest positioned parent or to the document. The plugin has been tested in IE6-9 and all the other major browsers.

The JavaScript (jQuery)

Below is the code for the plugin, to download the code with examples use the link above.

(function($){

  var settings = {
        speed: 350 //animation duration
      , easing: "linear" //use easing plugin for more options
      , padding: 10
      , constrain: false
    }
    , $window = $(window)
    , stickyboxes = []
    , methods = {

          init:function(opts){
            settings = $.extend(settings,opts);
            return this.each(function () {
              var $this = $(this);
              setPosition($this);
              stickyboxes[stickyboxes.length] = $this;
              moveIntoView();
            });
          }

        , remove:function(){
            return this.each(function () {
              var sticky = this;
              $.each(stickyboxes, function (i, $sb) {
                if($sb.get(0) === sticky){
                reset(null, $sb);
                stickyboxes.splice(i, 1);
                return false;
                }
              });
            });
          }

        , destroy: function () {
            $.each(stickyboxes, function (i, $sb) {
              reset(null, $sb);
            });
            stickyboxes=[];
            $window.unbind("scroll", moveIntoView);
            $window.unbind("resize", reset);
            return this;
          }

      };


  var moveIntoView = function () {
    $.each(stickyboxes, function (i, $sb) {
      var $this = $sb
        , data = $this.data("stickySB");
      if (data) {
        var sTop = $window.scrollTop() - data.offs.top
          , currOffs = $this.offset()
          , origTop = data.orig.offset.top - data.offs.top
          , animTo = origTop;
        //scrolled down out of view
        if (origTop < sTop) {
//make sure to stop inside parent
          if ((sTop + settings.padding) > data.offs.bottom)
            animTo = data.offs.bottom;
          else animTo = sTop + settings.padding;
        }
        $this
          .stop()
          .animate(
              {top: animTo}
            , settings.speed
            , settings.easing
        );
      }
    });
  }

  var setPosition = function ($sb) {
    if ($sb) {
      var $this = $sb
        , $parent = $this.parent()
        , parentOffs = $parent.offset()
        , currOff = $this.offset()
        , data = $this.data("stickySB");
      if (!data) {
        data = {
            offs: {} // our parents offset
          , orig: { // cache for original css
                top: $this.css("top")
              , left: $this.css("left")
              , position: $this.css("position")
              , marginTop: $this.css("marginTop")
              , marginLeft: $this.css("marginLeft")
              , offset: $this.offset()
            }
        }
      }
      //go up the tree until we find an elem to position from
      while (parentOffs && "top" in parentOffs
        && $parent.css("position") == "static") {
        $parent = $parent.parent();
        parentOffs = $parent.offset();
      }
      if (parentOffs) { // found a postioned ancestor
        var padBtm = parseInt($parent.css("paddingBottom"));
        padBtm = isNaN(padBtm) ? 0 : padBtm;
        data.offs = parentOffs;
        data.offs.bottom = settings.constrain ?
          Math.abs(($parent.innerHeight() - padBtm) - $this.outerHeight()) :
          $(document).height();
      }
      else data.offs = { // went to far set to doc
          top: 0
        , left: 0
        , bottom: $(document).height()
      };
      $this.css({
          position: "absolute"
        , top: Math.floor(currOff.top - data.offs.top) + "px"
        , left: Math.floor(currOff.left - data.offs.left) + "px"
        , margin: 0
        , width: $this.width()
      }).data("stickySB", data);
    }
  }

  var reset = function (ev, $toReset) {
    var stickies = stickyboxes;
    if ($toReset) { // just resetting selected items
      stickies = [$toReset];
    }
    $.each(stickies, function(i, $sb) {
      var data = $sb.data("stickySB");
      if (data) {
        $sb.css({
            position: data.orig.position
          , marginTop: data.orig.marginTop
          , marginLeft: data.orig.marginLeft
          , left: data.orig.left
          , top: data.orig.top
        });
        if (!$toReset) { // just resetting
          setPosition($sb);
          moveIntoView();
        }
      }
    });
  }

  $window.bind("scroll", moveIntoView);
  $window.bind("resize", reset);

  $.fn.stickySidebar = function (method) {

    if (methods[method]) {
      return methods[method].apply(
          this
        , Array.prototype.slice.call(arguments, 1)
      );
    } else if (!method || typeof method == "object") {
      return methods.init.apply(this, arguments);
    }

  }

})(jQuery);

Usage

The plugin can be used for single or multiple boxes as shown in the examples below

A Single sticky sidebar

1
2
3
4
5
6
7
8
9
10
11
12
13
<div id="main">
  <h2>Product catalogue</h2>
  <ul id="products">
      [...]
  </ul>
</div>
<div id="side">
   <div id="basket">
     <h3>Your basket</h3>
     <p>Total: <strong>&pound;455.00</strong></p>
     <span id="items">4</span>
   </div>
</div>

For the above snippet of a HTML page we can use the following to enable the product basket as a sticky sidebar with the default options.

1
$('#basket').stickySidebar();

Multiple sticky boxes

1
2
3
4
5
6
7
8
9
10
11
12
13
14
15
16
17
<div id="left">
  <h2>Left column</h2>
  <ol id="navbox" class="stickybox">
    <li><a href="#">Home</a></li>
    <li><a href="#">About</a></li>
    <li><a href="#">Contact</a></li>
  </ol>
</div>
<div id="middle"></div>
  <div id="right">
    <h2>Right column</h2>
    <div id="basket" class="stickybox">
      <h3>Your basket</h3>
      <p>Total: <strong>&pound;455.00</strong></p>
      <span id="items">4</span>
    </div>
</div>

For the above example we can use the below to set the navbox and basket boxes to both be sticky sidebars with the same options.

1
$('.stickbox').stickySidebar({speed: 400, padding: 30, constrain: true})

Options

The Sticky Sidebar plugin has four options:

  1. speed – how long the animation of the box should take in milliseconds (default = 250)
  2. easing – what type of easing to use for the animation (default = “linear”)
  3. padding – how many pixels to pad the element from the top of the window (default = 10)
  4. constrain – if true stops sticky scrolling out of parent

Methods

The Sticky Sidebar plugin has two methods:

  1. remove – removes the sticky selected sticky sidebars and resets to original position
  2. destroy – removes and resets all sticky sidebars and removes event listeners


http://www.profilepicture.co.uk/tutorials/sticky-sidebar-jquery-plugin/

by Anna 안나 2012. 1. 16. 14:44

영어지만 잘 설명된 글이 있다 : position:fixed for internet explorer

원리 설명이 잘 돼 있는 듯하다.

그리고 관련 토론은 여기서 볼 수 있다 : 떠다니는 레이어, 그 표준은?

아래는 내가 구현한 것이다.

?
1
2
3
4
5
6
7
8
9
10
11
12
13
14
15
$(document).ready(function(){
    var currentPosition = parseInt($(".float").css("top"));
    $(window).scroll(function() {
        var position = $(window).scrollTop(); // 현재 스크롤바의 위치값을 반환합니다.
        if(position>600){
            if($.browser.msie && $.browser.version < 7){
                $(".float").stop().animate({"top":position+currentPosition-600+"px"},1000);
            }else{
                $(".float").css({'position':'fixed', 'top':'20px'});
            }
        }else{
            $('.float').attr('style','');
        }
    });
});

위 코드는 어느 정도까지는 fixed돼 있지 않다가 스크롤을 좀 내리면 fixed 시키는 코드다. 이를 위해서 꼭 알아야 할 매서드는 scrollTop() 이다. jQuery의 매서드다.

$(window).scrollTop() : 현재 스크롤바의 위치를 반환한다. 정수값을 반환하게 된다.

$(window).scroll(function(){ /*함수 구현부*/ }) : 이 코드는 웹브라우저가 스크롤될 때 실행할 함수를 써 주는 부분이다. 위에서 보면 알겠지만 모든 함수 구현부가 바로 이 안에 인수로 들어가 있다.

function(){/*함수 구현부*/} 형식의 인수는 익명함수라고 한다. 특별한 함수 이름 없이 즉각 함수를 인자값처럼 넘길 수 있는 방식이다. 자바스크립트의 특징이라고 알고 있다.

위 코드가 jQuery쪽 코드고, HTML 쪽에는

?
1
<div class="float">나는 떠다니는 레이어</div>

이런 놈을 넣어 주면 되겠다.

msie 버전 6 이하에서는 position: fixed를 사용할 수 없기 때문에 jQuery의 animate 매서드를 이용해서 처리한다. 1000이라고 써 있는 부분은 동작이 일어나는 시간이다. 1000이 1초다. 이 시간을 늘리면 느리게 움직이고, 줄이면 빠르게 움직이다. 0으로 하면 순간이동을 하는데, 좋지가 않다.

position이 600보다 작을 때는 $('.float').attr('style','') 이라고 코드를 써 놨는데, 요소 스타일을 제거해 버리는 코드다. 그러면 jQuery를 이용해 임의로 매긴 스타일이 모두 사라진다. 단, 이를 위해서는 기본 스타일은 모두 css 파일에 담아 두어야 한다. 그렇지 않으면 기본 스타일로 박아 놓은 것도 함께 날아갈 테니 말이다.

시간이 없어서 친절한 설명을 하지 못해 아쉽다. 하지만 코드를 잘 분석하면 충분히 이해할 수 있을 거라 생각한다.


http://mytory.co.kr/archives/761

by Anna 안나 2012. 1. 16. 14:43
이전에 문제가 되었던 UIScrollView에서의 page detecting을 해결하기 위해 구글링 도중에 page의 lazy loading을 고민하는 사람이 많다는 것을 알게 되었다. 이는 지금 나같이 너댓장의 이미지를 로딩하는 데에는 큰 문제가 되지 않지만 수십 수백장의 이미지 혹은 다른 그 어떤 것을 로딩하기 에는 좀 문제가 된다.
원래대로라면 하나의 scrollview에 수십 수백장의 imageview를 addSubview를 이용해 추가하는 것인데 당연히 퍼포먼스나 메모리 관리 측면에서 문제가 안될리 없다. 그래서 많은 image gallery 어플이 하는 방식인 현재 보이는 view와 그 이전/이후의 view만을 로딩하는 lazy loading 방식에 대해 찾아 보다가 stack overflow에서 아래의 sample code를 발견했다.
먼저 interface 부분.
01.@interface UntitledViewController : UIViewController<UIScrollViewDelegate> {
02.@private
03.UIScrollView *_scrollView;
04. 
05.NSArray *_objects;
06. 
07.UILabel *_detailLabel1;
08.UILabel *_detailLabel2;
09.UILabel *_detailLabel3;
10.}
11. 
12.- (void)replaceHiddenLabels;
13.- (void)displayLabelsAroundIndex:(NSInteger)index;
14. 
15.@end

그리고 실제 구현 부분.
001.@implementation UntitledViewController
002. 
003.- (void)dealloc
004.{
005.[_objects release];
006.[_scrollView release];
007.[_detailLabel1 release];
008.[_detailLabel2 release];
009.[_detailLabel3 release];
010.[super dealloc];
011.}
012. 
013.- (void)viewDidLoad
014.{
015.[super viewDidLoad];
016. 
017._objects = [[NSArray alloc] initWithObjects:@"first", @"second", @"third",
018.@"fourth", @"fifth", @"sixth", @"seventh", @"eight", @"ninth", @"tenth", nil];
019. 
020._scrollView = [[UIScrollView alloc] initWithFrame:CGRectMake(0.0, 0.0, 320.0, 460.0)];
021._scrollView.contentSize = CGSizeMake(320.0 * [_objects count], 460.0);
022._scrollView.showsVerticalScrollIndicator = NO;
023._scrollView.showsHorizontalScrollIndicator = YES;
024._scrollView.alwaysBounceHorizontal = YES;
025._scrollView.alwaysBounceVertical = NO;
026._scrollView.pagingEnabled = YES;
027._scrollView.delegate = self;
028. 
029._detailLabel1 = [[UILabel alloc] initWithFrame:CGRectMake(0.0, 0.0, 320.0, 460.0)];
030._detailLabel1.textAlignment = UITextAlignmentCenter;
031._detailLabel1.font = [UIFont boldSystemFontOfSize:30.0];
032._detailLabel2 = [[UILabel alloc] initWithFrame:CGRectMake(320.0, 0.0, 320.0, 460.0)];
033._detailLabel2.textAlignment = UITextAlignmentCenter;
034._detailLabel2.font = [UIFont boldSystemFontOfSize:30.0];
035._detailLabel3 = [[UILabel alloc] initWithFrame:CGRectMake(640.0, 0.0, 320.0, 460.0)];
036._detailLabel3.textAlignment = UITextAlignmentCenter;
037._detailLabel3.font = [UIFont boldSystemFontOfSize:30.0];
038. 
039.// We are going to show all the contents of the _objects array
040.// using only these three UILabel instances, making them jump
041.// right and left, replacing them as required:
042.[_scrollView addSubview:_detailLabel1];
043.[_scrollView addSubview:_detailLabel2];
044.[_scrollView addSubview:_detailLabel3];
045. 
046.[self.view addSubview:_scrollView];
047.}
048. 
049.- (void)viewDidAppear:(BOOL)animated
050.{
051.[super viewDidAppear:animated];
052.[_scrollView flashScrollIndicators];
053.}
054. 
055.- (void)viewWillAppear:(BOOL)animated
056.{
057.[super viewWillAppear:animated];
058.[self displayLabelsAroundIndex:0];
059.}
060. 
061.- (void)didReceiveMemoryWarning
062.{
063.// Here you could release the data source, but make sure
064.// you rebuild it in a lazy-loading way as soon as you need it again...
065.[super didReceiveMemoryWarning];
066.}
067. 
068.#pragma mark -
069.#pragma mark UIScrollViewDelegate methods
070. 
071.- (void)scrollViewWillBeginDragging:(UIScrollView *)scrollView
072.{
073.// Do some initialization here, before the scroll view starts moving!
074.}
075. 
076.- (void)scrollViewDidEndDecelerating:(UIScrollView *)scrollView
077.{
078.[self replaceHiddenLabels];
079.}
080. 
081.- (void)displayLabelsAroundIndex:(NSInteger)index
082.{
083.NSInteger count = [_objects count];
084.if (index >= 0 && index < count)
085.{
086.NSString *text = [_objects objectAtIndex:index];
087._detailLabel1.frame = CGRectMake(320.0 * index, 0.0, 320.0, 460.0);
088._detailLabel1.text = text;
089.[_scrollView scrollRectToVisible:CGRectMake(320.0 * index, 0.0, 320.0, 460.0) animated:NO];
090. 
091.if (index < (count - 1))
092.{
093.text = [_objects objectAtIndex:(index + 1)];
094._detailLabel2.frame = CGRectMake(320.0 * (index + 1), 0.0, 320.0, 460.0);
095._detailLabel2.text = text;
096.}
097. 
098.if (index > 0)
099.{
100.text = [_objects objectAtIndex:(index - 1)];
101._detailLabel3.frame = CGRectMake(320.0 * (index - 1), 0.0, 320.0, 460.0);
102._detailLabel3.text = text;
103.}
104.}
105.}
106. 
107.- (void)replaceHiddenLabels
108.{
109.static const double pageWidth = 320.0;
110.NSInteger currentIndex = ((_scrollView.contentOffset.x - pageWidth) / pageWidth) + 1;
111. 
112.UILabel *currentLabel = nil;
113.UILabel *previousLabel = nil;
114.UILabel *nextLabel = nil;
115. 
116.if (CGRectContainsPoint(_detailLabel1.frame, _scrollView.contentOffset))
117.{
118.currentLabel = _detailLabel1;
119.previousLabel = _detailLabel2;
120.nextLabel = _detailLabel3;
121.}
122.else if (CGRectContainsPoint(_detailLabel2.frame, _scrollView.contentOffset))
123.{
124.currentLabel = _detailLabel2;
125.previousLabel = _detailLabel1;
126.nextLabel = _detailLabel3;
127.}
128.else
129.{
130.currentLabel = _detailLabel3;
131.previousLabel = _detailLabel1;
132.nextLabel = _detailLabel2;
133.}
134. 
135.currentLabel.frame = CGRectMake(320.0 * currentIndex, 0.0, 320.0, 460.0);
136.currentLabel.text = [_objects objectAtIndex:currentIndex];
137. 
138.// Now move the other ones around
139.// and set them ready for the next scroll
140.if (currentIndex < [_objects count] - 1)
141.{
142.nextLabel.frame = CGRectMake(320.0 * (currentIndex + 1), 0.0, 320.0, 460.0);
143.nextLabel.text = [_objects objectAtIndex:(currentIndex + 1)];
144.}
145. 
146.if (currentIndex >= 1)
147.{
148.previousLabel.frame = CGRectMake(320.0 * (currentIndex - 1), 0.0, 320.0, 460.0);
149.previousLabel.text = [_objects objectAtIndex:(currentIndex - 1)];
150.}
151.}
152. 
153.@end

언더바를 많이 쓰고 대괄호 쓰는 방식이 C 프로그래밍 스타일이라 좀 별로지만 그대로 옮겨왔다. 수정하기 귀찮... 하여간 이 코드를 그대로 갖다 복사해도 동작한다. scrollview에 각각 label을 붙이는 subview를 만들어서 한번에 세개의 view를 로딩하고 스크롤할 때마다 다시 그 다음 것들을 loading하는 방식이다.

그리고 추가로 저 위의 scrollViewDidEndDecelerating 메소드 안에 아래의 코드를 갖다 붙이면 현재 보이는 page를 알아낼 수 있다.

1.int page = floor((_scrollView.contentOffset.x - PAGE_WIDTH / 2) / PAGE_WIDTH) + 1;

http://yangsae.tistory.com/38
by Anna 안나 2012. 1. 16. 14:39
mixsh나 twtkr등에서 스크를 마지막에 가면 자동으로 다음 글들을 불러 오게 하는 자료입니다.
JQUERY로 짜여졌고 간단합니다.

엄청나게 간단하네요....;;;

링크에 실제 배포하는 사이트 남겨 두었습니다.

샘플보기(스크롤해서 내려 보세요) :
http://www.webresourcesdepot.com/dnspinger/


구조설명:

컨텐츠 페이지 구조
<div class="wrdLatest" id=1>content</div>
<div class="wrdLatest" id=2>content</div>
<div id="lastPostsLoader"></div>

로딩중 이미지 보여주는 부분과 실제 데이터 가져오는 부분
function lastPostFunc()
{
    $('div#lastPostsLoader').html('<img src="bigLoader.gif">');
    $.post("scroll.asp?action=getLastPosts&lastID=" + $(".wrdLatest:last").attr("id"),   


    function(data){
        if (data != "") {
        $(".wrdLatest:last").after(data);           
        }
        $('div#lastPostsLoader').empty();
    });
};

스크롤 감지하는 부분
$(window).scroll(function(){
        if  ($(window).scrollTop() == $(document).height() - $(window).height()){
          lastPostFunc();
        }
});

http://dev.dayis.net/17
by Anna 안나 2012. 1. 16. 14:38
블로그를 한창 할때, 믹시의 스크롤 페이징을 보고서 어떻게 하는 건지 참 많이 궁금해 했던 기억이 납니다. 
졸립기도 하고 갑자기 스크롤 페이징이 생각 나서 검색해봤는데 쭌스님의 포스팅과 Raj Gorsia님의 포스팅을 찾게 되었습니다. 스크립트 라이브러리를 사용하지 않는다면 쭌스님의 글을 참고해서 작성하면 되겠고 JQuery를 사용한다면 Raj Gorsia님의 글을 거의 그대로 사용하면 되겠네요.

예전에 제가 감을 잡지 못 했던 부분은 아래 한줄입니다. ㅠ.ㅠ
if ($(window).scrollTop() == $(document).height() - $(window).height()) { 
또는
if(content.scrollTop < content.scrollHeight - 500)
이렇게 간단한데 말이죠... 

지금은 응용할만한 프로그램을 만들지 않지만 다음에 꼭 활용해서 만들어 보고 싶네요. 


<%@ page language="java" contentType="text/html; charset=UTF-8" pageEncoding="UTF-8"%>
<!DOCTYPE html PUBLIC "-//W3C//DTD XHTML 1.0 Transitional//EN" "http://www.w3.org/TR/xhtml1/DTD/xhtml1-transitional.dtd">
<html xmlns="http://www.w3.org/1999/xhtml">
<head>
<meta http-equiv="Content-Type" content="text/html; charset=euc-kr" />
<title>JQuery</title>
<link rel="stylesheet" type="text/css" href="css.css"/>
<script type="text/javascript" src="jquery-1.6.min.js"></script>
<script type="text/javascript">
//<![CDATA[
var pageLoaded = 1; //현재 페이지

$(window).scroll( function() {
if ($(window).scrollTop() == $(document).height() - $(window).height()) {
pageLoaded = pageLoaded + 1; 
// ajax를 추가해서 목록을 받아온다
// alert(pageLoaded);
$('#main_content').append(
"main_content"+pageLoaded+"<br><br><br><br><br><br><br><br><br><br><br><br><br>");
}
});
//]]>
</script>

<style type="text/css">

</style>

</head>
<body>
<div id="top_menu">
<ul id="topUL">
<li class="to_home"><a href="/">HOME</a></li>
<li class="top_menu_li" id="login_btn">로그인</li>
<li class="top_menu_li"> | </li>
<li class="top_menu_li" id="join_btn">회원가입</li>
</ul>
</div>
<div id="wrap">
<div id="left_menu">left_menu</div>
<div id="content">
<div id="login_box">login_box</div>
<div id="join_box">join_box</div>
<div id="main_content">
main_content1<br><br><br><br><br><br><br><br><br><br><br><br><br>
main_content2<br><br><br><br><br><br><br><br><br><br><br><br><br>
main_content3<br><br><br><br><br><br><br><br><br><br><br><br><br>
main_content4<br><br><br><br><br><br><br><br><br><br><br><br><br>
main_content5<br><br><br><br><br><br><br><br><br><br><br><br><br>
</div>
</div>
<div id="right_menu">right_menu</div>
</div>
</body>
</html>

참조 1 : 스크롤 페이징(Scroll Paging, Continuous scrolling pattern)
참조 2 : Load Content While Scrolling With jQuery

http://www.rtong.net/1148
by Anna 안나 2012. 1. 16. 14:37
http://net.tutsplus.com/tutorials/javascript-ajax/inettuts/

Finished Project

The plan

First, let's list exactly what we'll be creating here and what features it'll have:

  • This interface will contain several widgets.
  • Each widget can be collapsed, removed and edited.
  • The widgets can be sorted into the three seperate columns by the user (using a drag and drop technique).
  • The user will be able to edit the color and title of each widget.
  • Each widget can contain any amount of regular HTML content, text, images, flash etc.

Please note that we will only be covering the front-end aspect of the project in this tutorial. Obviously you could integrate this UI with a solid server-side system which could take care of saving preferences and customised widgets.

Since it's all about the user and because the idea was influenced by iGoogle we're going to be calling this project 'iNettuts'.

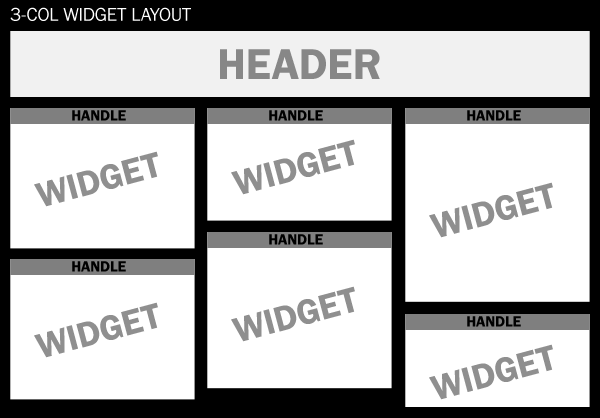
The layout of iNettuts

The layout is a simple three column one; each column contains widgets:

layout

Each widget has a "handle" which the user can use to move the widget around.

jQuery UI

As well as the jQuery core library we're also going to make use of the jQuery's UI library and specifically the "sortable" and "draggable" modules. This will make it quite simple to add the drag-and-drop functionality that we want. You should get a personalized download of the UI library which has what we need in it. (Tick the 'sortable' box)

Step 1: XHTML markup

Each column will be an unordered list (UL) and each widget within the columns will be a list item (LI):

First column:

  1. <ul id="column1" class="column">  
  2.   
  3.     <li class="widget red">    
  4.         <div class="widget-head">  
  5.             <h3>Widget title</h3>  
  6.         </div>  
  7.         <div class="widget-content">  
  8.   
  9.             <p>The content...</p>  
  10.         </div>  
  11.     </li>  
  12.     <li class="widget blue">    
  13.         <div class="widget-head">  
  14.   
  15.             <h3>Widget title</h3>  
  16.         </div>  
  17.         <div class="widget-content">  
  18.             <p>The content...</p>  
  19.   
  20.         </div>  
  21.     </li>  
  22. </ul>  

The above code represents the first column, on the left and two widgets each within a list item. As shown in the plan, there will be three columns - three unordered lists.

Step 2: CSS

We'll be using two CSS StyleSheets, one of them will contain all the main styles and the second StyleSheet will only contain styles required by the JavaScript enhancements. The reason we seperate them like this is so that people without JavaScript enabled do not waste their bandwidth downloading styles which they're not going to use.

Here is inettuts.css:

  1. /* Reset */  
  2. body,img,p,h1,h2,h3,h4,h5,h6,ul,ol {margin:0; padding:0; list-style:noneborder:none;}  
  3. /* End Reset */  
  4.       
  5. body {font-size:0.8em; font-family:Arial,Verdana,Sans-Serifbackground#000;}  
  6. a {color:white;}  
  7.       
  8. /* Colours */  
  9. .color-yellow {background:#f2bc00;}  
  10. .color-red    {background:#dd0000;}  
  11. .color-blue   {background:#148ea4;}  
  12. .color-white  {background:#dfdfdf;}  
  13. .color-orange {background:#f66e00;}  
  14. .color-green  {background:#8dc100;}  
  15. .color-yellow h3,.color-white h3,.color-green h3  
  16.     {color:#000;}  
  17. .color-red h3,.color-blue h3,.color-orange h3  
  18.     {color:#FFF;}  
  19. /* End Colours */  
  20.       
  21. /* Head section */  
  22. #head {  
  23.     background#000 url(img/head-bg.png) repeat-x;  
  24.     height100px;  
  25. }  
  26. #head h1 {  
  27.     line-height100px;  
  28.     color#FFF;  
  29.     text-aligncenter;  
  30.     backgroundurl(img/inettuts.png) no-repeat center;  
  31.     text-indent: -9999em  
  32. }  
  33. /* End Head Section */  
  34.       
  35. /* Columns section */  
  36. #columns .column {  
  37.     floatleft;  
  38.     width: 33.3%;  
  39.         /* Min-height: */  
  40.         min-height400px;  
  41.         heightauto !important;   
  42.         height400px;  
  43. }  
  44.       
  45. /* Column dividers (background-images) : */  
  46.     #column#column1 { backgroundurl(img/column-bg-left.png) no-repeat rightright top; }  
  47.     #column#column3 { backgroundurl(img/column-bg-rightright.png) no-repeat left top; }  
  48.           
  49. #column#column1 .widget { margin30px 35px 30px 25px; }  
  50. #column#column3 .widget { margin30px 25px 30px 35px; }  
  51. #columns .widget {  
  52.     margin30px 20px 0 20px;  
  53.     padding2px;  
  54.     -moz-border-radius: 4px;  
  55.     -webkit-border-radius: 4px;  
  56. }  
  57. #columns .widget .widget-head {  
  58.     color#000;  
  59.     overflowhidden;  
  60.     width: 100%;  
  61.     height30px;  
  62.     line-height30px;  
  63. }  
  64. #columns .widget .widget-head h3 {  
  65.     padding: 0 5px;  
  66.     floatleft;  
  67. }  
  68. #columns .widget .widget-content {  
  69.     background#333 url(img/widget-content-bg.png) repeat-x;  
  70.     padding5px;  
  71.     color#DDD;  
  72.     -moz-border-radius-bottomleft: 2px;  
  73.     -moz-border-radius-bottomright: 2px;  
  74.     -webkit-border-bottom-left-radius: 2px;  
  75.     -webkit-border-bottom-rightright-radius: 2px;  
  76.     line-height: 1.2em;  
  77.     overflowhidden;  
  78. }  
  79. /* End Columns section */  

There's nothing too complicated in the above StyleSheet. Normally it would be better to use images instead of the CSS3 border-radius property to create rounded corners (for cross-browser benefits) but they're not really an integral part of the layout - adding a border-radius is quick and painless.

Just a note about the colour classes: Ideally, elements should be named according to their semantic meaning or content, not their appearance. The problem is that the widgets can mean/contain many different things so having classes like this really is the best alternative, unless you're willing to add the colour styles inline. Each colour class is prefixed with 'color-'; it'll become clear why I've done this later in the tutorial.

In the above CSS we're also using a min-height hack for each column so that the background images (the dividers) remain intact and so that an empty column can still have widgets dragged back into it:

  1. #columns .column {  
  2.     floatleft;  
  3.     width: 33.3%;  
  4.       
  5.     /* Min-height: */  
  6.         min-height400px;  
  7.         heightauto !important;   
  8.         height400px;  
  9. }  

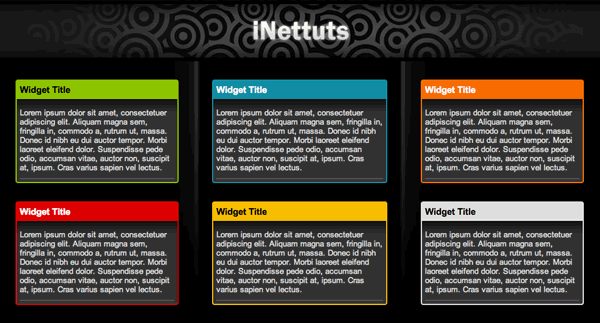
We'll focus on the second stylesheet later when we've added the JavaScript.

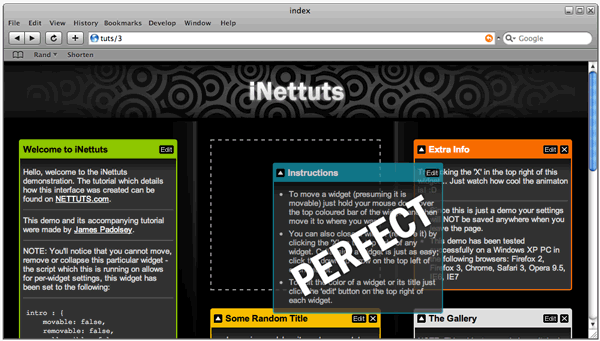
Here's a preview of what we've got so far, just CSS/HTML (and some images):

layout

Step 3: JavaScript

Introduction

As I've said, we'll be using jQuery. It's the library of choice not only because of the UI modules it offers but also because it will help in speeding up the development process while keeping everything cross-browser operable.

The final product will have endless possibilities, some of which have already been explored by the likes of NetVibes and iGoogle. So, we want to make sure our code is easily maintainable, allows for expandability and is reusable; we want it to be future-proof!

We'll begin with a global object called "iNettuts" - this will act as the sole occupied namespace of the project (plus dependencies such as jQuery). Under it we will code up the main functionality of the site which utilises jQuery and its UI library.

inettuts.js:

  1. var iNettuts = {  
  2.     settings : {  
  3.        // Some simple settings will go here.  
  4.     },  
  5.     init : function(){  
  6.         // The method which starts it all...  
  7.     }  
  8. };  

The init method will be called when the document is ready for manipulation (i.e. when the DOM is loaded and ready). While there are various methods available it has been proven that the quickest way to initialise your code upon this event is to call it from the bottom of your document. It also makes sense to link to all the scripts at the bottom so as not to slow down the loading of the rest of the page:

  1. <body>  
  2.       
  3.     <!-- page content -->  
  4.   
  5.       
  6.       
  7.     <!-- Bottom of document -->  
  8.     <script type="text/javascript" src="http://jqueryjs.googlecode.com/files/jquery-1.2.6.min.js"></script>  
  9.     <script type="text/javascript" src="inettuts.js"></script>  
  10.   
  11.     <script type="text/javascript" src="jquery-ui-personalized-1.6rc2.min.js"></script>  
  12.       
  13. </body>  

Settings

As I've said, there will be a settings object which will contain all of the global settings required to make this functional. We'll also have individual widget settings objects, this means it will be possible to create per-widget settings.

settings object (under iNettuts):

  1. settings : {  
  2.     /* Specify selectors */  
  3.     columns : '.column',  
  4.     widgetSelector: '.widget',  
  5.     handleSelector: '.widget-head',  
  6.     contentSelector: '.widget-content',  
  7.     /* Settings for the Widgets: */  
  8.     widgetDefault : {  
  9.         movable: true,  
  10.         removable: true,  
  11.         collapsible: true,  
  12.         editable: true,  
  13.         colorClasses : ['yellow','red','blue','white','orange','green']  
  14.     },  
  15.     /* Individual Widget settings: */  
  16.     widgetIndividual : {  
  17.         intro : {  
  18.             movable: false,  
  19.             removable: false,  
  20.             collapsible: false  
  21.         },  
  22.         gallery : {  
  23.             colorClasses : ['yellow','red','white']  
  24.         }  
  25.     }  
  26. }  

Yes, there are quite a lot of settings, but if we want maximum code reusability this is a necessity. Most of the above is self explanatory. As you can see we've setup a widgetDefault object which contains the default settings for each widget; if you want to override these settings then the script will require you to give the widget an id (in the HTML) and then create a new ruleset. We've got two rule-sets (objects) which override their defaults, 'intro' and 'gallery'. So, those rules specified in the "gallery" object will only apply to this widget:

  1. <li class="widget blue" id="gallery">    
  2.     <div class="widget-head">  
  3.         <h3>Instructions</h3>  
  4.     </div>  
  5.   
  6.     <div class="widget-content">  
  7.         <ul>  
  8.             <li>To move a widget...</li>  
  9.         </ul>  
  10.     </div>  
  11.   
  12. </li>  

Retrieving the settings

getWidgetSettings object (under iNettuts):

  1. getWidgetSettings : function(id) {  
  2.     var settings = this.settings;  
  3.     return (id&&settings.widgetIndividual[id]) ?   
  4.         $.extend({},settings.widgetDefault,settings.widgetIndividual[id])  
  5.         : settings.widgetDefault;  
  6. }  

This method will return an object with the settings of any particular widget. If a widget has no id (HTML attribute) then it will just return the default settings, otherwise it will look to see if that widget has settings of its own, if it does then it will return the default settings and that widget's settings merged into a single object (the widget's individual settings have precedence).

Attaching a CSS file using JavaScript

I mentioned earlier that we have an additional stylesheet which the JavaScript enhancements will require.

Here's the StyleSheet (inettuts.js.css):

  1. /* JS-Enabled CSS */  
  2.       
  3. .widget-head a.remove  {  
  4.     floatrightright;  
  5.     displayinline;  
  6.     backgroundurl(img/buttons.gif) no-repeat -24px 0;  
  7.     width14px;  
  8.     height14px;  
  9.     margin8px 4px 8px 0;  
  10.     text-indent: -9999em;  
  11.     outlinenone;  
  12. }  
  13.       
  14. .widget-head a.edit  {  
  15.     floatrightright;  
  16.     displayinline;  
  17.     backgroundurl(img/buttons.gif) no-repeat;  
  18.     width24px;  
  19.     height14px;  
  20.     text-indent: -9999em;  
  21.     margin8px 4px 8px 4px;  
  22.     outlinenone;  
  23. }  
  24.       
  25. .widget-head a.collapse  {  
  26.     floatleft;  
  27.     displayinline;  
  28.     backgroundurl(img/buttons.gif) no-repeat -52px 0;  
  29.     width14px;  
  30.     height14px;  
  31.     text-indent: -9999em;  
  32.     margin8px 0 8px 4px;  
  33.     outlinenone;  
  34. }  
  35.       
  36. .widget-placeholder { border2px dashed #999;}  
  37. #column1 .widget-placeholder { margin30px 35px 0 25px; }  
  38. #column2 .widget-placeholder { margin30px 20px 0 20px; }  
  39. #column3 .widget-placeholder { margin30px 25px 0 35px; }  
  40.       
  41. .edit-box {  
  42.     overflowhidden;  
  43.     background#333 url(img/widget-content-bg.png) repeat-x;  
  44.     margin-bottom2px;  
  45.     padding10px 0;  
  46. }  
  47.       
  48. .edit-box li.item {  
  49.     padding10px 0;  
  50.     overflowhidden;  
  51.     floatleft;  
  52.     width: 100%;  
  53.     clearboth;  
  54. }  
  55.       
  56. .edit-box label {  
  57.     floatleft;  
  58.     width: 30%;  
  59.     color#FFF;  
  60.     padding: 0 0 0 10px;  
  61. }  
  62.       
  63. .edit-box ul.colors li {  
  64.     width20px;  
  65.     height20px;  
  66.     border1px solid #EEE;  
  67.     floatleft;  
  68.     displayinline;  
  69.     margin: 0 5px 0 0;  
  70.     cursorpointer;  
  71. }  

The elements targetted in the above StyleSheet have yet to be coded, but eventually we will write the JavaScript which dynamically adds these elements to the page, thus making use of the StyleSheet.

The method which attaches this StyleSheet is called 'attachStylesheet':

  1. attachStylesheet : function (href) {  
  2.     return $('<link href="' + href + '" rel="stylesheet" type="text/css" />').appendTo('head');  
  3. }  

The above method appends a link to the head of the document. When a new link element is added to the document through the DOM the browser will load it and apply its CSS rules as it would for any regular hard-coded linked StyleSheet. When doing this, remember that the rules of CSS inheritance and specificity still apply.

Making the widgets work

Widgets

The next part of the tutorial is probably the hardest, so take it slowly.

We want to add another method to our global iNettuts object, we'll call it makeSortable:

  1. makeSortable : function () {  
  2.     // This function will make the widgets 'sortable'!  
  3. }  

By the way, 'method' is just a fancy name given to 'functions' which have been assigned to object properties. In this case our object is called 'iNettuts' so 'makeSortable' is a method of 'iNettuts'...

This new method will take the settings we specified in the 'settings' object and make the required element sortable.

First, we want to make sure everything we need is easily accessible within this new method:

  1. makeSortable : function () {  
  2.     var iNettuts = this// *1  
  3.         $ = this.jQuery, // *2  
  4.         settings = this.settings; // *3  
  5. }  

*1: There will only be one instance of our global object, but just encase multiple instances need to be made or if we want to rename the global object it's a good idea to set a new variable (in this case 'iNettuts') to the 'this' keyword which references the object that this method is within. Be careful, the 'this' keyword is a bit of a beast and doesn't always reference what you think it does!

*2: At the very top of the iNettuts object we've placed a new property: 'jQuery : $'. In the pursuit of maximum code reusability we don't want our script to conflict with any other libraries that also make use of the dollar-sign symbol (e.g. The Prototype library). So, for example, if you renamed jQuery to JQLIB then you could change the 'jQuery' property to JQLIB and the script would continue to function properly. The 2nd line in the above code isn't necessary at all, - if we didn't want it we could just use this.jQuery().ajQueryFunction() instead of $() within this method.

*3: Again, this isn't really necessary, we're just creating a bit of a shortcut, so instead of having to type out 'this.settings' within this method we only need to type out 'settings'.

The next step is to define a set of sortable items (i.e. the widgets that will be movable). Remember, back in the settings we made it possible to set a property called 'movable' to true or false. If 'movable' is set to false, either by default or on individual widgets we have to cater for that:

  1. /* 
  2.  * (using the dollar prefix on $sortableItems is a convention when a variable references a jQuery object) 
  3.  */  
  4.     
  5. $sortableItems = (function () {  
  6.       
  7.     // Define an empty string which can add to within the loop:  
  8.     var notSortable = '';  
  9.       
  10.     // Loop through each widget within the columns:  
  11.     $(settings.widgetSelector,$(settings.columns)).each(function (i) {  
  12.           
  13.         // If the 'movable' property is set to false:  
  14.         if (!iNettuts.getWidgetSettings(this.id).movable) {  
  15.               
  16.             // If this widget has NO ID:   
  17.             if(!this.id) {  
  18.                   
  19.                 // Give it an automatically generated ID:  
  20.                 this.id = 'widget-no-id-' + i;  
  21.                   
  22.             }  
  23.           
  24.             // Add the ID to the 'notSortable' string:  
  25.             notSortable += '#' + this.id + ',';  
  26.         }  
  27.           
  28.     });  
  29.       
  30.     /* 
  31.     * This function will return a jQuery object containing 
  32.     * those widgets which are movable. 
  33.     */  
  34.     return $('> li:not(' + notSortable + ')', settings.columns);  
  35. })();  

Now we've got a set of DOM elements referenced in the jQuery object which is returned from the above functions. We can make immediate use of this:

  1. $sortableItems.find(settings.handleSelector).css({  
  2.     cursor: 'move'  
  3. }).mousedown(function (e) {  
  4.     $(this).parent().css({  
  5.         width: $(this).parent().width() + 'px'  
  6.     });  
  7. }).mouseup(function () {  
  8.     if(!$(this).parent().hasClass('dragging')) {  
  9.         $(this).parent().css({width:''});  
  10.     }  
  11. });  

So, we're looking for what has been defined as the 'handle' within the movable widgets (within sortableItems) and then we're applying a new CSS cursor property of 'move' to each one; this is to make it obvious that each widget is movable.

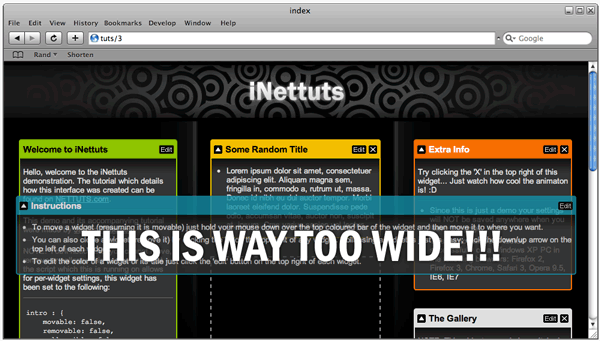
The mousedown and mouseup functions are needed to work around some issues with dragging and dropping... Since we want this page and all the elements inside it to expand when the browser is resized we haven't set any explicit widths on the widgets (list items). When one of these list items is being sorted it becomes absolutely positioned (while being dragged) which means that it will stretch to its content's composite width. Here's an example:

When dragged the widget stretches to length of page

This is what should be happening:

When dragged the widget has the correct width!

To make this happen we have explicitly set the widget's width to what it was before dragging had begun. The UI 'sortable' module does have a property in which you can put a function that will run when a widget starts being sorted (i.e. when it starts being dragged), unfortunately this is not good enough for us because it runs too late; we need to set the width before the 'sortable' module takes hold - the best way to do this is by running a function on mousedown of the handle (the 'handle', in this case, is the bar at the top of each widget).

  1. // mousedown function:  
  2. // Traverse to parent (the widget):  
  3. $(this).parent().css({  
  4.     // Explicitely set width as computed width:  
  5.     width: $(this).parent().width() + 'px'  
  6. });  

If we leave it like this then when you drop the widget in a certain place and res

the browser the widget will not change in size. In order to prevent this we need to write a function to be tied to the mouseup event of the handle:

  1. // mouseup function:  
  2. // Check if widget is currently in the process of dragging:  
  3. if(!$(this).parent().hasClass('dragging')) {  
  4.     // If it's not then reset width to '':  
  5.     $(this).parent().css({width:''}); 
  6. } else { 
  7.     // If it IS currently being dragged then we want to  
  8.     // temporarily disable dragging, while widget is 
  9.     // reverting to original position. 
  10.     $(settings.columns).sortable('disable');  
  11. }  

The 'dragging' class is added on that 'start' property of the sortable module which we talked about earlier. (we'll write that code later)

This is what our makeSortable method looks like so far:

  1. makeSortable : function () {  
  2.     var iNettuts = this,  
  3.         $ = this.jQuery,  
  4.         settings = this.settings,  
  5.           
  6.         $sortableItems = (function () {  
  7.             var notSortable = '';  
  8.             $(settings.widgetSelector,$(settings.columns)).each(function (i) {  
  9.                 if (!iNettuts.getWidgetSettings(this.id).movable) {  
  10.                     if(!this.id) {  
  11.                         this.id = 'widget-no-id-' + i;  
  12.                     }  
  13.                     notSortable += '#' + this.id + ',';  
  14.                 }  
  15.             });  
  16.             return $('> li:not(' + notSortable + ')', settings.columns);  
  17.         })();  
  18.       
  19.     $sortableItems.find(settings.handleSelector).css({  
  20.         cursor: 'move'  
  21.     }).mousedown(function (e) {  
  22.         $sortableItems.css({width:''});  
  23.         $(this).parent().css({  
  24.             width: $(this).parent().width() + 'px'  
  25.         });  
  26.     }).mouseup(function () {  
  27.         if(!$(this).parent().hasClass('dragging')) {  
  28.             $(this).parent().css({width:''});  
  29.         } else {  
  30.             $(settings.columns).sortable('disable');  
  31.         }  
  32.     });  
  33. }  

Next, still within 'makeSortable' we need to initialise the 'sortable' module:

  1. makeSortable : function () {  
  2.     // ...........................  
  3.     // BEGINNING OF METHOD (above)  
  4.     // ...........................  
  5.       
  6.     // Select the columns and initiate 'sortable':  
  7.     $(settings.columns).sortable({  
  8.       
  9.         // Specify those items which will be sortable:  
  10.         items: $sortableItems,  
  11.           
  12.         // Connect each column with every other column:  
  13.         connectWith: $(settings.columns),  
  14.           
  15.         // Set the handle to the top bar:  
  16.         handle: settings.handleSelector,  
  17.           
  18.         // Define class of placeholder (styled in inettuts.js.css)  
  19.         placeholder: 'widget-placeholder',  
  20.           
  21.         // Make sure placeholder size is retained:  
  22.         forcePlaceholderSize: true,  
  23.           
  24.         // Animated revent lasts how long?  
  25.         revert: 300,  
  26.           
  27.         // Delay before action:  
  28.         delay: 100,  
  29.           
  30.         // Opacity of 'helper' (the thing that's dragged):  
  31.         opacity: 0.8,  
  32.           
  33.         // Set constraint of dragging to the document's edge:  
  34.         containment: 'document',  
  35.           
  36.         // Function to be called when dragging starts:  
  37.         start: function (e,ui) {  
  38.             $(ui.helper).addClass('dragging');  
  39.         },  
  40.           
  41.         // Function to be called when dragging stops:  
  42.         stop: function (e,ui) {  
  43.           
  44.             // Reset width of units and remove dragging class:  
  45.             $(ui.item).css({width:''}).removeClass('dragging');  
  46.               
  47.             // Re-enable sorting (we disabled it on mouseup of the handle):  
  48.             $(settings.columns).sortable('enable');  
  49.               
  50.         }  
  51.           
  52.     });  
  53.       
  54. }  

The above options setup the behaviour we want for our sortable widgets. There are plenty more available options for this module but those above will be sufficient for now.

Editing, removing and collapsing widgets

The next step is to make it possible for the user to collapse widgets, close (remove) widgets and edit certain elements within each widget.

We're going to put this all within one method, we'll call it 'addWidgetControls':

  1. addWidgetControls : function () {  
  2.     // This function will add controls to each widget!  
  3. }  

As with 'makeSortable' we want to set the following variables at the start:

  1. addWidgetControls : function () {  
  2.     var iNettuts = this,  
  3.         $ = this.jQuery,  
  4.         settings = this.settings;  
  5. }  

We need to loop through every widget on the page and add functionality dependent on the default settings or the settings made for any particular widget.

  1. // Loop through each widget:  
  2. $(settings.widgetSelector, $(settings.columns)).each(function () {  
  3.   
  4.     /* Merge individual settings with default widget settings */  
  5.     var thisWidgetSettings = iNettuts.getWidgetSettings(this.id);  
  6.       
  7.     // (if "removable" option is TRUE):  
  8.     if (thisWidgetSettings.removable) {  
  9.       
  10.         // Add CLOSE (REMOVE) button & functionality  
  11.           
  12.     }  
  13.       
  14.     // (if "removable" option is TRUE):  
  15.     if (thisWidgetSettings.editable) {  
  16.       
  17.         // Add EDIT button and functionality  
  18.           
  19.     }  
  20.       
  21.     // (if "removable" option is TRUE):  
  22.     if (thisWidgetSettings.collapsible) {  
  23.       
  24.         // Add COLLAPSE button and functionality  
  25.           
  26.     }  
  27.           
  28. });  

As you can see from the above code, we're checking the settings before adding any one of the three buttons and each button’s corresponding functionality.

Before we write out exactly what will happen within each of three conditions let's list exactly what each of these buttons will do:

  • CLOSE (remove): This button will remove the widget from the DOM. Instead of just removing it immediately we'll apply an effect which will fade out he widget and then slide up its occupied space.
  • EDIT: This button, when clicked, will bring up an 'edit box' section within the widget. Within this 'edit' section the user can change the title of the widget and its colour. To close the 'edit' section the user must click on the same 'edit' button again - so basically this button toggles the 'edit' section.
  • COLLAPSE: This button switches between an up-arrow and a down-arrow dependent whether the widget is collapsed or not. Collapsing a widget will simply hide its content, so the only viewable of the widget will be the handle (the bar at the top of each widget).

We know what we want now, so we can start writing it: (The snippets below are riddles with comments so make sure you read through the code!)

CLOSE (remove):

  1. // (if "removable" option is TRUE):  
  2. if (thisWidgetSettings.removable) {  
  3.       
  4.     // Create new anchor element with class of 'remove':  
  5.     $('<a href="#" class="remove">CLOSE</a>').mousedown(function (e) {  
  6.       
  7.         // Stop event bubbling:  
  8.         e.stopPropagation();   
  9.              
  10.     }).click(function () {  
  11.       
  12.         // Confirm action - make sure that the user is sure:  
  13.         if(confirm('This widget will be removed, ok?')) {  
  14.           
  15.             // Animate widget to an opacity of 0:  
  16.             $(this).parents(settings.widgetSelector).animate({  
  17.                 opacity: 0      
  18.             },function () {  
  19.               
  20.                 // When animation (opacity) has finished:  
  21.                 // Wrap in DIV (explained below) and slide up:  
  22.                 $(this).wrap('<div/>').parent().slideUp(function () {  
  23.                   
  24.                     // When sliding up has finished, remove widget from DOM:  
  25.                     $(this).remove();  
  26.                       
  27.                 });  
  28.             });  
  29.         }  
  30.           
  31.         // Return false, prevent default action:  
  32.         return false;  
  33.           
  34.     })  
  35.       
  36.     // Now, append the new button to the widget handle:  
  37.     .appendTo($(settings.handleSelector, this));  
  38.       
  39. }  

EDIT:

  1. /* (if "editable" option is TRUE) */  
  2. if (thisWidgetSettings.editable) {  
  3.       
  4.     // Create new anchor element with class of 'edit':  
  5.     $('<a href="#" class="edit">EDIT</a>').mousedown(function (e) {  
  6.           
  7.         // Stop event bubbling  
  8.         e.stopPropagation();  
  9.           
  10.     }).toggle(function () {  
  11.         // Toggle: (1st state):  
  12.           
  13.         // Change background image so the button now reads 'close edit':  
  14.         $(this).css({backgroundPosition: '-66px 0', width: '55px'})  
  15.               
  16.             // Traverse to widget (list item):  
  17.             .parents(settings.widgetSelector)  
  18.                   
  19.                 // Find the edit-box, show it, then focus <input/>:  
  20.                 .find('.edit-box').show().find('input').focus();  
  21.                   
  22.         // Return false, prevent default action:  
  23.         return false;  
  24.           
  25.     },function () {  
  26.         // Toggle: (2nd state):  
  27.           
  28.         // Reset background and width (will default to CSS specified in StyleSheet):  
  29.         $(this).css({backgroundPosition: '', width: ''})  
  30.               
  31.             // Traverse to widget (list item):  
  32.             .parents(settings.widgetSelector)  
  33.                   
  34.                 // Find the edit-box and hide it:  
  35.                 .find('.edit-box').hide();  
  36.         // Return false, prevent default action:  
  37.         return false;  
  38.   
  39.     })  
  40.       
  41.     // Append this button to the widget handle:  
  42.     .appendTo($(settings.handleSelector,this));  
  43.       
  44.     // Add the actual editing section (edit-box):  
  45.     $('<div class="edit-box" style="display:none;"/>')  
  46.         .append('<ul><li class="item"><label>Change the title?</label><input value="' + $('h3',this).text() + '"/></li>')  
  47.         .append((function(){  
  48.               
  49.             // Compile list of available colours:  
  50.             var colorList = '<li class="item"><label>Available colors:</label><ul class="colors">';  
  51.               
  52.             // Loop through available colors - add a list item for each:  
  53.             $(thisWidgetSettings.colorClasses).each(function () {  
  54.                 colorList += '<li class="' + this + '"/>';  
  55.             });  
  56.               
  57.             // Return (to append function) the entire colour list:  
  58.             return colorList + '</ul>';  
  59.               
  60.         })())  
  61.           
  62.         // Finish off list:  
  63.         .append('</ul>')  
  64.           
  65.         // Insert the edit-box below the widget handle:  
  66.         .insertAfter($(settings.handleSelector,this));  
  67.           
  68. }  

COLLAPSE:

  1. // (if 'collapsible' option is TRUE)   
  2. if (thisWidgetSettings.collapsible) {  
  3.       
  4.     // Create new anchor with a class of 'collapse':  
  5.     $('<a href="#" class="collapse">COLLAPSE</a>').mousedown(function (e) {  
  6.           
  7.         // Stop event bubbling:  
  8.         e.stopPropagation();  
  9.           
  10.   
  11.     }).toggle(function () {  
  12.         // Toggle: (1st State):  
  13.           
  14.         // Change background (up-arrow to down-arrow):  
  15.         $(this).css({backgroundPosition: '-38px 0'})  
  16.           
  17.             // Traverse to widget (list item):  
  18.             .parents(settings.widgetSelector)  
  19.                 // Find content within widget and HIDE it:  
  20.                 .find(settings.contentSelector).hide();  
  21.                   
  22.         // Return false, prevent default action:  
  23.         return false;  
  24.           
  25.     },function () {  
  26.         // Toggle: (2nd State):  
  27.           
  28.         // Change background (up-arrow to down-arrow):  
  29.         $(this).css({backgroundPosition: ''})  
  30.           
  31.             // Traverse to widget (list item):  
  32.             .parents(settings.widgetSelector)  
  33.               
  34.                 // Find content within widget and SHOW it:  
  35.                 .find(settings.contentSelector).show();  
  36.                   
  37.         // Return false, prevent default action:  
  38.         return false;  
  39.           
  40.     })  
  41.       
  42.     // Prepend that 'collapse' button to the widget's handle:  
  43.     .prependTo($(settings.handleSelector,this));  
  44. }  

What is "Event Bubbling"?

Event bubbling or 'propagation' is when, upon clicking on an element, the event will bubble up through the DOM to the highest level element with an event the same as the event you just triggered on the original element. If we didn't stop propogation in the above snippets (e.stopPropagation();) on the mouseDown event of each added button then the mouseDown event of the handle (parent of the buttons) would also trigger and thus the dragging would would begin just by holding your mouse down over one of the buttons - we don't want this to happen; we only want dragging to begin when the user puts their mouse directly over the handle and pushes down.

Edit-box events/functionality

We've written the code which will inject the edit boxes into the document in the correct places. - We added an input box so users can change the title of a widget and we also added a list of available colours. So, we now need to loop through each new edit-box (hidden from view) and specify how these elements can be interacted with:

  1. // Loop through each edit-box (under each widget that has an edit-box)  
  2. $('.edit-box').each(function () {  
  3.       
  4.     // Assign a function to the onKeyUp event of the input:  
  5.     $('input',this).keyup(function () {  
  6.           
  7.         // Traverse UP to widget and find the title, set text to  
  8.         // the input element's value - if the value is longer  
  9.         // than 20 characters then replace remainder characters  
  10.         // with an elipsis (...).  
  11.         $(this).parents(settings.widgetSelector).find('h3').text( $(this).val().length>20 ? $(this).val().substr(0,20)+'...' : $(this).val() ); 
  12.          
  13.     }); 
  14.      
  15.     // Assing a function to the Click event of each colour list-item: 
  16.     $('ul.colors li',this).click(function () { 
  17.          
  18.         // Define colorStylePattern to match a class with prefix 'color-': 
  19.         var colorStylePattern = /\bcolor-[\w]{1,}\b/, 
  20.              
  21.             // Define thisWidgetColorClass as the colour class of the widget: 
  22.             thisWidgetColorClass = $(this).parents(settings.widgetSelector).attr('class').match(colorStylePattern) 
  23.         // If a class matching the pattern does exist: 
  24.         if (thisWidgetColorClass) { 
  25.              
  26.             // Traverse to widget: 
  27.             $(this).parents(settings.widgetSelector) 
  28.              
  29.                 // Remove the old colour class: 
  30.                 .removeClass(thisWidgetColorClass[0]) 
  31.                  
  32.                 // Add new colour class (n.b. 'this' refers to clicked list item): 
  33.                 .addClass($(this).attr('class').match(colorStylePattern)[0]);  
  34.                   
  35.         }  
  36.           
  37.         // Return false, prevent default action:  
  38.         return false;  
  39.           
  40.     });  
  41. });  

The edit-boxes are entirely functional now. All the above code resides in the 'addWidgetControls' method.

  1. addWidgetControls : function () {  
  2.     var iNettuts = this,  
  3.         $ = this.jQuery,  
  4.         settings = this.settings;  
  5.           
  6.     $(settings.widgetSelector, $(settings.columns)).each(function () {  
  7.         var thisWidgetSettings = iNettuts.getWidgetSettings(this.id);  
  8.           
  9.         if (thisWidgetSettings.removable) {  
  10.             $('<a href="#" class="remove">CLOSE</a>').mousedown(function (e) {  
  11.                 e.stopPropagation();      
  12.             }).click(function () {  
  13.                 if(confirm('This widget will be removed, ok?')) {  
  14.                     $(this).parents(settings.widgetSelector).animate({  
  15.                         opacity: 0      
  16.                     },function () {  
  17.                         $(this).wrap('<div/>').parent().slideUp(function () {  
  18.                             $(this).remove();  
  19.                         });  
  20.                     });  
  21.                 }  
  22.                 return false;  
  23.             }).appendTo($(settings.handleSelector, this));  
  24.         }  
  25.           
  26.         if (thisWidgetSettings.editable) {  
  27.             $('<a href="#" class="edit">EDIT</a>').mousedown(function (e) {  
  28.                 e.stopPropagation();      
  29.             }).toggle(function () {  
  30.                 $(this).css({backgroundPosition: '-66px 0', width: '55px'})  
  31.                     .parents(settings.widgetSelector)  
  32.                         .find('.edit-box').show().find('input').focus();  
  33.                 return false;  
  34.             },function () {  
  35.                 $(this).css({backgroundPosition: '', width: ''})  
  36.                     .parents(settings.widgetSelector)  
  37.                         .find('.edit-box').hide();  
  38.                 return false;  
  39.             }).appendTo($(settings.handleSelector,this));  
  40.             $('<div class="edit-box" style="display:none;"/>')  
  41.                 .append('<ul><li class="item"><label>Change the title?</label><input value="' + $('h3',this).text() + '"/></li>')  
  42.                 .append((function(){  
  43.                     var colorList = '<li class="item"><label>Available colors:</label><ul class="colors">';  
  44.                     $(thisWidgetSettings.colorClasses).each(function () {  
  45.                         colorList += '<li class="' + this + '"/>';  
  46.                     });  
  47.                     return colorList + '</ul>';  
  48.                 })())  
  49.                 .append('</ul>')  
  50.                 .insertAfter($(settings.handleSelector,this));  
  51.         }  
  52.           
  53.         if (thisWidgetSettings.collapsible) {  
  54.             $('<a href="#" class="collapse">COLLAPSE</a>').mousedown(function (e) {  
  55.                 e.stopPropagation();      
  56.             }).toggle(function () {  
  57.                 $(this).css({backgroundPosition: '-38px 0'})  
  58.                     .parents(settings.widgetSelector)  
  59.                         .find(settings.contentSelector).hide();  
  60.                 return false;  
  61.             },function () {  
  62.                 $(this).css({backgroundPosition: ''})  
  63.                     .parents(settings.widgetSelector)  
  64.                         .find(settings.contentSelector).show();  
  65.                 return false;  
  66.             }).prependTo($(settings.handleSelector,this));  
  67.         }  
  68.     });  
  69.       
  70.     $('.edit-box').each(function () {  
  71.         $('input',this).keyup(function () {  
  72.             $(this).parents(settings.widgetSelector).find('h3').text( $(this).val().length>20 ? $(this).val().substr(0,20)+'...' : $(this).val() );  
  73.         });  
  74.         $('ul.colors li',this).click(function () {  
  75.               
  76.             var colorStylePattern = /\bcolor-[\w]{1,}\b/,  
  77.                 thisWidgetColorClass = $(this).parents(settings.widgetSelector).attr('class').match(colorStylePattern)  
  78.             if (thisWidgetColorClass) {  
  79.                 $(this).parents(settings.widgetSelector)  
  80.                     .removeClass(thisWidgetColorClass[0])  
  81.                     .addClass($(this).attr('class').match(colorStylePattern)[0]);  
  82.             }  
  83.             return false;  
  84.               
  85.         });  
  86.     });  
  87.       
  88. }  

Almost finished

Now that we've written most of the JavaScript we can write the initiating method and intialise the script!

  1. // Additional method within 'iNettuts' object:  
  2. init : function () {  
  3.     this.attachStylesheet('inettuts.js.css');  
  4.     this.addWidgetControls();  
  5.     this.makeSortable();  
  6. }  

Now, to start it all:

  1. // Right at the very end of inettuts.js  
  2. iNettuts.init();  

Just so we're clear, this is the overall structure of our iNettuts object with each of its methods explained:

  1. var iNettuts = {  
  2.       
  3.     /* Set's jQuery identifier: */  
  4.     jQuery : $,  
  5.       
  6.     settings : {  
  7.           
  8.         /*    Name : settings 
  9.          *    Type : Object 
  10.          * Purpose : Object to store preferences for widget behaviour 
  11.          */  
  12.            
  13.     },  
  14.   
  15.     init : function () {  
  16.           
  17.         /*    Name : init 
  18.          *    Type : Function 
  19.          * Purpose : Initialise methods to be run when page has loaded. 
  20.          */  
  21.            
  22.     },  
  23.       
  24.     getWidgetSettings : function (id) {  
  25.           
  26.         /*      Name : getWidgetSettings 
  27.          *      Type : Function 
  28.          * Parameter : id of widget 
  29.          *   Purpose : Get default and per-widget settings specified in  
  30.          *             the settings object and return a new object 
  31.          *             combining the two, giving per-widget settings 
  32.          *             precedence obviously. 
  33.          */  
  34.            
  35.     },  
  36.       
  37.     addWidgetControls : function () {  
  38.           
  39.         /*    Name : settings 
  40.          *    Type : Function 
  41.          * Purpose : Adds controls (e.g. 'X' close button) to each widget. 
  42.          */  
  43.            
  44.     },  
  45.       
  46.     attachStylesheet : function (href) {  
  47.           
  48.         /*      Name : settings 
  49.          *      Type : Function 
  50.          * Parameter : href location of stylesheet to be added 
  51.          *   Purpose : Creates new link element with specified href and  
  52.          *             appends to <head> 
  53.          */  
  54.            
  55.     },  
  56.       
  57.     makeSortable : function () {  
  58.           
  59.         /*    Name : settings 
  60.          *    Type : Function 
  61.          * Purpose : Makes widgets sortable (draggable/droppable) using 
  62.          *           the jQuery UI 'sortable' module. 
  63.          */  
  64.            
  65.     }  
  66.     
  67. };  

 Finished!

Finished Project

We're totally finished, the interface should be totally operable now. I've tested it on my PC (running Windows XP) in the following browsers: Firefox 2, Firefox 3, Opera 9.5, Safari 3, IE6, IE7 & Chrome.

Note: There are a couple of issues in IE. Specifically, it doesn't set the placeholder size correctly plus there are some CSS issues in IE6 (to be expected).

At first glance this interface's potential applications seem limited to those like iGoogle or NetVibes but it can, in fact, be used for many different things.

  • You could, for example use it on your blog by giving the user the option to sort your blog's widgets in the sidebar - you could then save their preference to a cookie so that the widgets would be in the same order when the user returns.
  • If you add a user authentication system and a database then you've got yourself a simple iGoogle.
  • The 'sortable' plugin itself can be used for sorting any elements, they don't have to be widgets.

Regardless of whether you're going to use this in a project or not I hope you've learnt something today!


by Anna 안나 2009. 3. 1. 00:20
http://net.tutsplus.com/articles/web-roundups/the-20-most-practical-and-creative-uses-of-jquery/

There have been plenty of posts on the number of awesome jQuery plugins and where to find them. However, sometimes it is best not to rely on third party plugins and resources. Do it yourself the old fashioned way! Today, we will have a look at 20+ creative uses of jQuery in modern day websites and applications; sure to inspire you for your next project.

Author: Drew Douglass

Hi, I'm Drew and I am a freelance developer and designer. I love all things having to do with PHP, MySQL, CSS, or jQuery. You can find my weekly articles on the ThemeForest blog and at Dev-Tips.com. Feel free to follow me if you're a fellow twitter addict.

  • James Padolsey Color Switcher

    Screenshot 1

    One of our sporadic writers, James Padolsey, has a nice feature on his website. A "customize" bar in the top right portion of the screen allows you to change the background color of the header.

    Visit Site

  • Dragon Interactives jQuery Navigation

    Screenshot 1

    These guys are pretty much Gods of web design, and their site really proves it. Just have a look at the custom jQuery navigation they used on their homepage. Have you ever seen such a sexy navigation in your life?

    Visit Site

  • FamSpams FaceBox

    Screenshot 2

    FamFamFam needed a custom lightbox like script for FamSpam (whew, say that three times). They ended up building what is now know as FaceBox, which replicates the effects of lightbox, but goes above and beyond by allowing you to load in static html pages, contact forms, anything you wish really! FaceBox is now a jQuery plugin after all the demand for their script.

    Visit Site

  • Grooveshark Widget Creator

    Screenshot 3

    Instead of going with a typical flash menu/control menu, Grooveshark mixed it up a bit and built a custom jQuery script to allow you to make your own music widgets; pretty nifty indeed.

    Visit Site

  • CSS-Tricks Fade-In Navigation

    Screenshot 4

    CSS-Tricks, by Chris Coyier, is next up on the list with a wonderfully simple and creative jQuery navigation. When the links are hovered over, instead of immediately changing colors, jQuery is used to help the color fade slowly to the desired color.

    Visit Site

  • David Walsh Link Nudge

    Screenshot 5

    Developer David Walsh of DavidWalsh.name implements an extremely simple to use script to give your links a little nudge on hover. The script utilizes the strong animation capabilities of jQuery triggered on hover. Check out the links in the sidebar and in the footer to see the effect in action.

    Visit Site

  • CarrotCreative-Custom Sites Lightbox

    Screenshot 6

    If you check out the CarrotCreative website, you will actually notice two really unique jQuery effects. Firstly, if you click on sites in the upper left, you will see a unique application of a 'lightbox' like effect listing their sites and icons. Secondly, if you click on any navigation links, you will notice there is no refresh, but that the new page just slides in from the right. Cool stuff!

    Visit Site

  • BrightCreative Portfolio

    Screenshot 7

    Another "two for one" special, Bright Creative uses an extremely subtle glow effect in their navigation that is very calming and warm. In addition, all of their portfolio pages have a tabbing effect, so their is no need for the user to refresh the page every time - thanks to AJAX and jQuery.

    Visit Site

  • Incredible Login Form

    Screenshot 1

    Not too long ago, Connor Zwick wrote us a nice tutorial that demonstrates exactly how to build an amazing drop-down login form.

    Visit Site

  • Application Scroller by Aviary

    Screenshot 8

    It would be an insult to call this a type of 'marquee' (shivers uttering that word). Instead, Aviary came up with a very nice looking and functioning 'scroller' to showcase a lot of text in a small amount of space. Even better is that the scroller will degrade gracefully is javascript is disabled.

    Visit Site

  • Featured Fade Effect by DesignFlavr

    Screenshot 9

    DesignFlavr, known for their great sources of design inspiration, put together a simple fadeIn/fadeOut script to showcase their featured artwork and corresponding descriptions. Also, they've used the lavalamp plugin quite well on their main navigation.

    Visit Site

  • Hv-Designs Fade In RSS Icon

    Screenshot 11

    On the Hv-Designs homepage, you will notice the the RSS icon starts off as an outline/sketch of the actual image. Then, when hovered, the rss icons 'glows' into place.

    Visit Site

  • Asylums Custom Scroller

    Screenshot 12

    Besides being an absolutely hilarious website, Asylum has their own sweet 'featured articles' scrolling script. It's hard to put a finger on why this one is so nice, but that is probably because it behaves slightly differently than most scrolling scripts. It almost seems to snap into place after you give it a click.

    Visit Site

  • 5 Javascript Tricks Made Easy with jQuery

    Screenshot 14

    Brian Reindel created a webpage showcasing 5 custom scripts you can use however you like. The article takes ideas and previous javascript techniques frequently used and utilizes jQuery to make them powerful, compact, and easy to read.

    Visit Site

  • Codas Entire Website

    Screenshot 15

    Coda is well known for its amazing UI and site design. It set a fire under the jQuery plugin community by inspiring many developers to re create their page tabbing effect. In addition, they have a wonderful on hover effect on the links located in the header.

    Visit Site

  • Clark Lab Fading Effect

    Screenshot 16

    ClarkLab is a well known and very successful author on ThemeForest. If you visit his portfolio below, you will notice the large header images eventually fade to the next, showcasing all of his latest work. The fade effect is so well done and subtle, you barely notice the new image showing up.

    Visit Site

  • Rob Young | E is for Effort

    Screenshot 17

    Designer and Art Director Rob Young used a unique idea of displaying his artwork on a simulated Mac screen. Then using jQuery scrolling effects, each new page slides into the page view as if it is being loaded on a computer.

    Visit Site

  • Web Designer Wall

    Screenshot 18

    Besides being a visually stunning website, WDW features some unique custom jQuery scripting to add classes to certain elements on hover. Check out the effects when the rss and navigation items are hovered over.

    Visit Site

  • Junaid W. Hanif

    Screenshot 19

    Another really cool tabbing effect - instead of arrows however, pagination and AJAX is used to create a sleek and clean user experience. Plus, the navigation has a very nice albeit simple effect.

    Visit Site

  • KomodoMedia

    Screenshot 19

    I've saved my absolute favorite site for last. First, just look at that design, it's wonderfully unique and comforting. Using one of the most creative jQuery scripts I have ever seen, KM has a 'foliage-o-meter' slider where sliding it either increases or decreases the foliage and design of the theme, depending on the direction the slider is moved. For an easter egg be sure to check out the source code!

    Visit Site

Keep in mind that jQuery is simply a tool and is only limited by your creativity and skill level. Get unique with your designs and development process and you might be surprised to see great results occur. Please be sure to share any of your favorite websites featuring unique uses of jQuery in the comments section below! ...And a Digg or Stumble would be greatly appreciated! :)

  • Subscribe to the NETTUTS RSS Feed for more daily web development tuts and articles.

by Anna 안나 2009. 2. 27. 18:42
http://nameslayer.tistory.com/tag/jquery

최근에 개발을 하면서 jQuery를 사용하기 시작했다. prototype보다 기본으로 제공되는 UI도
괜찮아보여 사용하기 시작하였는데, 역시 쉽지만은 않았다. ㅠㅠ
나도 어여 괜찮은 플러그인들을 개발할 수 있도록 노력중이지만, 언제쯤이나 가능할련지..

이하 펌...
==============================================================

알려진 JavaScript Framework(Library) 중 최근 가장 주목을 받고 있는 것중의 하나가 jQuery로 흥미롭게 살펴보고 있다.  
이전 포스트의 내용과 새로운 내용을 포함하여 정리한다.


* 주요 플러그인

01) Lightbox 류
 -
warren.mesozen.com/jquery-lightbox/
 - ThickBox 3.1  jquery.com/demo/thickbox/  [IE7, position bug]
 -
jQuery Lightbox Plugin
 - Facebox  famspam.com/facebox
 - FancyBox  fancy.klade.lv
 -
Simple Modal 
 - jqModal 
 -
prettyPhoto
 - Suckerfish HoverLightbox
 - piroBox 

02) Menu & Navigation
-
Elastic Menu : like mootools sliding effect
-
Step Menu
-
Navigation : LavaLamp
- Tree-View Menu
- jQuery File Tree
- jQuery UI Tabs
-
Tabbed Content [demo]
- Create A Tabbed Interface Using jQuery
-
Keypress Navigation Using jQuery
- Sliding Top Menu With jQuery
- Sprite + jQuery Navigation  Background Image Animation
- Sliding Menu
- Apple style Menu
- Garage Door Style Menu

03) Sliding & Scroll & Tickter 류
- ez=jQuery (Easy Slide, Easy News, Easy News Plus, Easy POP Show
- liScroll (a jQuery News Ticker made easy)
- InnerFade with jQuery

04) Message Alert 류
-
Dialog
-
Floating Windows
-
Tooltips  simple tooltip
- jGrowl (notice)
- Top Floating Message box using jQuery

05) Date Picker (Calendar)
-
Calendar(date-picker)
- Date Range Picker

06) Color Picker
-
Color Picker 
-
eyecon.ro/colorpicker/

07) Charts 류
-
Flot, jQuery plotting plug-in
- charts using canvas 
-
jQchart
- jQuery.sparkline

08) Accordion
-
Accordion
- dynamicDrive version accordion
- from Roshanbh.com - Blog
- accordion, a simple horizontal accordion plugin for jQuery

09) Forms
- Form
-
Nice Form 
-
Form Input Plugin 
-
Flexible and Semantic Forms
- Submit A Form Without Page Refresh using jQuery
- autotab
- Using Ajax to Validate Forms
- Auto-populating Select Boxes using jQuery & Ajax
- jQuery tutorial: Text box hints
- Forms, Context highlighting

10) Image
-
imgAreaSelect (crop)
- Jcrop (이미지 crop)
-
jQZoom
- jQuery Cycle plugin
- Fix the missing PNG-transparency in IE5.5, IE6
- Image Show(ImageFlow)
- SpaceGallery
- jquery-exif-data-plugin
- jParallax - view layered image
- SliderViewer
- Galleriffic
- dwImageProtector Plugin for jQuery

11) Table
-
tableSorter
- Zebra-Stripe Tables
- jQuery Table Striping Bug

12) Utility
- Dimension
- Interface
-
getUrlParam
- jQuery.Hotkeys.Testing
- Parsing Strings with jQuery
- addSizes.js: Sanzzy automatic link file-size generation
- Creating a Virtual jQuery Keyboard
- Cookie

13) Effect
- Flip

14)
jRails (jQuery on Rails)

15) Extensible CSS interface 2: CSS Selectors & jQuery

16) In-Place Editor

17) Virtual Tour

18) Simple Star Rating System

19) jQuery Corner

20) Feature your products with jQuery


[참고]
-
jQuery Ideas and Resources
- jQuery for Designers , jQuery Tutorials for Designers
- 51+ Best of jQuery Tutorials and Examples
- 50+ Amazing jQuery Examples - part1
- 37 More Shocking jQuery Plugins
- 45+ Fresh Out of the oven jQuery Plugins
- 65 Excellent jQuery Resources
- 8 Fantastic jQuery Tutorials for Designers
- Useful jQuery: A Compilation of jQuery Utilities
- CSS Developer - Why Aren't You Using jQuery?
- Absolute Positioning Using JQuery
- 20 jQuery Plugins for Unforgettable User Experience
- jQuery Robot
by Anna 안나 2009. 2. 23. 17:31
오늘자 ajaxian에 올라온 포스트 중에 jQuery Tip으로 링크에 걸린 파일사이즈를 자동으로 알아낸뒤 링크뒤에 출력해주는 포스팅을 번역해서 올려본다.


jQuery(function($){
$('a[href$=".pdf"], a[href$=".doc"], a[href$=".mp3"], a[href$=".m4u"]').each(function(){
// looking at the href of the link, if it contains .pdf or .doc or .mp3
var link = $(this);
var bits = this.href.split('.');
var type = bits[bits.length -1];


var url= "http://json-head.appspot.com/?url="+encodeURI($(this).attr('href'))+"&callback=?";

// then call the json thing and insert the size back into the link text
$.getJSON(url, function(json){
if(json.ok && json.headers['Content-Length']) {
var length = parseInt(json.headers['Content-Length'], 10);

// divide the length into its largest unit
var units = [
[1024 * 1024 * 1024, 'GB'],
[1024 * 1024, 'MB'],
[1024, 'KB'],
[1, 'bytes']
];

for(var i = 0; i <units.length; i++){

var unitSize = units[i][0];
var unitText = units[i][1];

if (length>= unitSize) {
length = length / unitSize;
// 1 decimal place
length = Math.ceil(length * 10) / 10;
var lengthUnits = unitText;
break;
}
}

// insert the text directly after the link and add a class to the link
link.after(' (' + type + ' ' + length + ' ' + lengthUnits + ')');
link.addClass(type);
}
});
});
});


소스에서 굵게 표시된 json.headers 를 이용해서 컨텐츠의 사이즈를 알아온뒤 link.after메쏘드로 화면에 출력해 주었다...
너무도 간단하게.. ㅡ.,ㅡ;

addSizes.js

샘플사이트 : http://natbat.net/code/clientside/js/addSizes/
<!DOCTYPE html PUBLIC "-//W3C//DTD HTML 4.01//EN"
"http://www.w3.org/TR/html4/strict.dtd">

<html lang="en">
<head>
<meta http-equiv="Content-Type" content="text/html; charset=utf-8">
<title>addSizes</title>
<!-- Date: 2008-07-29 -->
<script src="http://ajax.googleapis.com/ajax/libs/jquery/1.2.6/jquery.min.js" type="text/javascript"></script>
<script src="addSizes.js" type="text/javascript"></script>
</head>
<body>
<h1>addSizes</h1>
<p>This is a link to a remote <a href="http://clearleft.com/worksheet/client-worksheet.doc">doc</a> file.</p>
<p>This is a link to a remote <a href="http://www.onyx.com/pdf/CustomerMgmtBrochure.pdf">pdf</a> file.</p>
<p>This is a link to a remote <a href="http://media.giantbomb.com/podcast/giantbombcast-071708.mp3">mp3</a> file.</p>

<p>This is a link to a local <a href="media/test.doc">doc</a> file.</p>
<p>This is a link to a remote <a href="media/test.pdf">pdf</a> file.</p>
<p>This is a link to a remote <a href="media/test.mp3">mp3</a> file.</p>
</body>
</html>

'JS > jquery' 카테고리의 다른 글

jQuery 스크롤 페이징  (0) 2012.01.16
스크롤 페이징(Scroll Paging, Continuous scrolling pattern)  (0) 2012.01.16
How to Mimic the iGoogle Interface  (0) 2009.03.01
The 20 Most Practical and Creative Uses of jQuery  (0) 2009.02.27
jQuery Plugin  (0) 2009.02.23
jQuery Loading바 구현하기  (0) 2009.01.05
Test if jquery has loaded  (0) 2009.01.05
IE를 위해 코딩할때  (0) 2009.01.05
CSS Text Gradients  (0) 2009.01.04
jQuery 강좌 링크  (0) 2008.12.14
by Anna 안나 2009. 1. 5. 01:23
이미 아는 사람들은 다아는 로딩바 원하는 형태로 만들기 사이트(http://www.ajaxload.info/)에서 좋은 Loading Indicator(Spinner)를 구한 다음에 아래와 같이 간단히 구현할 수 있다.

jQuery(function($){
// Create img dom element and insert it into our document
var loading = $('<img alt="loading" src="/images/loading.gif" />')
.appendTo(document.body).hide();
// Make the image appear during ajax calls
$(window).ajaxStart(loading.show);
$(window).ajaxStop(loading.hide);
});


참고적으로 요기도 보아두면 좋아요~~
jQuery를 모르는 분들은 여기서 부터 시작하세요
by Anna 안나 2009. 1. 5. 01:21
$(document).ready(function() {
alert('hi');
});

This uses jQuery's .ready function on the document object


Sure. You could do this:if (typeof jQuery != 'undefined') { // do something}

'JS > jquery' 카테고리의 다른 글

How to Mimic the iGoogle Interface  (0) 2009.03.01
The 20 Most Practical and Creative Uses of jQuery  (0) 2009.02.27
jQuery Plugin  (0) 2009.02.23
jQuery 링크에 걸린 파일 사이즈 자동으로 알아내기  (0) 2009.01.05
jQuery Loading바 구현하기  (0) 2009.01.05
IE를 위해 코딩할때  (0) 2009.01.05
CSS Text Gradients  (0) 2009.01.04
jQuery 강좌 링크  (0) 2008.12.14
InnerFade with JQuery  (0) 2008.12.14
jQuery Corner Demo  (0) 2008.12.14
by Anna 안나 2009. 1. 5. 01:20
var qustn = $('body').layout({
north: { initClosed: false, size: "52", closable: false, resizable: false },
defaults: { applyDefaultStyles: true }
});

아무거나 예제를 들고왔다.
맨끝에 ,(쉼표) 를 붙이면 안된다.
연결을 위해서 중간에 , 를 붙이기도 하지만..
파폭에는 상관없는데, 익스에서는 맨끝에 쉼표를 붙이면 안먹혀진다..ㅠㅠ흑.
(저는 IE7에서 테스트해봤습니다)

이것때매 얼마나고생했는지..참..

파폭에서 잘되길래 되겠지 하며 IE7을 켰더니 참담~하더라!

'JS > jquery' 카테고리의 다른 글

The 20 Most Practical and Creative Uses of jQuery  (0) 2009.02.27
jQuery Plugin  (0) 2009.02.23
jQuery 링크에 걸린 파일 사이즈 자동으로 알아내기  (0) 2009.01.05
jQuery Loading바 구현하기  (0) 2009.01.05
Test if jquery has loaded  (0) 2009.01.05
CSS Text Gradients  (0) 2009.01.04
jQuery 강좌 링크  (0) 2008.12.14
InnerFade with JQuery  (0) 2008.12.14
jQuery Corner Demo  (0) 2008.12.14
jQuery Treeview Plugin Demo  (0) 2008.12.14
by Anna 안나 2009. 1. 5. 00:48
http://cssglobe.com/lab/textgradient/

'JS > jquery' 카테고리의 다른 글

jQuery Plugin  (0) 2009.02.23
jQuery 링크에 걸린 파일 사이즈 자동으로 알아내기  (0) 2009.01.05
jQuery Loading바 구현하기  (0) 2009.01.05
Test if jquery has loaded  (0) 2009.01.05
IE를 위해 코딩할때  (0) 2009.01.05
jQuery 강좌 링크  (0) 2008.12.14
InnerFade with JQuery  (0) 2008.12.14
jQuery Corner Demo  (0) 2008.12.14
jQuery Treeview Plugin Demo  (0) 2008.12.14
jQuery를 이용한 쇼핑카드 예제  (0) 2008.12.14
by Anna 안나 2009. 1. 4. 21:56
안녕하세요?
최근 가장 인기있는 자바스크립트 라이브러리는 jQuery입니다.
MS도 ASP.NET MVC에 jQuery를 포함시킬 예정입니다.이미 시중에 jQuery 책이 번역되어 나와 있지만,
IBM 사이트에서 jQuery 강좌를 번역해서 연재하고 있으니까
이것을 먼저 보시는 것도 좋으리라 생각합니다.http://www.ibm.com/developerworks/kr/library/wa-jquery1/index.html
http://www.ibm.com/developerworks/kr/library/wa-jquery2/index.htmlhttp://www.ibm.com/developerworks/kr/library/x-ajaxjquery.html
http://www.ibm.com/developerworks/kr/library/wa-aj-overhaul1/index.html
http://www.ibm.com/developerworks/kr/library/wa-aj-overhaul2/index.html

'JS > jquery' 카테고리의 다른 글

jQuery 링크에 걸린 파일 사이즈 자동으로 알아내기  (0) 2009.01.05
jQuery Loading바 구현하기  (0) 2009.01.05
Test if jquery has loaded  (0) 2009.01.05
IE를 위해 코딩할때  (0) 2009.01.05
CSS Text Gradients  (0) 2009.01.04
InnerFade with JQuery  (0) 2008.12.14
jQuery Corner Demo  (0) 2008.12.14
jQuery Treeview Plugin Demo  (0) 2008.12.14
jQuery를 이용한 쇼핑카드 예제  (0) 2008.12.14
가볍고 쉬운 Ajax - jQuery 시작하기  (0) 2008.12.14
by Anna 안나 2008. 12. 14. 19:34
provenance 참조

'JS > jquery' 카테고리의 다른 글

jQuery Loading바 구현하기  (0) 2009.01.05
Test if jquery has loaded  (0) 2009.01.05
IE를 위해 코딩할때  (0) 2009.01.05
CSS Text Gradients  (0) 2009.01.04
jQuery 강좌 링크  (0) 2008.12.14
jQuery Corner Demo  (0) 2008.12.14
jQuery Treeview Plugin Demo  (0) 2008.12.14
jQuery를 이용한 쇼핑카드 예제  (0) 2008.12.14
가볍고 쉬운 Ajax - jQuery 시작하기  (0) 2008.12.14
renderCalendar  (0) 2008.12.14
by Anna 안나 2008. 12. 14. 19:33
provenance 참조

'JS > jquery' 카테고리의 다른 글

Test if jquery has loaded  (0) 2009.01.05
IE를 위해 코딩할때  (0) 2009.01.05
CSS Text Gradients  (0) 2009.01.04
jQuery 강좌 링크  (0) 2008.12.14
InnerFade with JQuery  (0) 2008.12.14
jQuery Treeview Plugin Demo  (0) 2008.12.14
jQuery를 이용한 쇼핑카드 예제  (0) 2008.12.14
가볍고 쉬운 Ajax - jQuery 시작하기  (0) 2008.12.14
renderCalendar  (0) 2008.12.14
플러그인 소개 demo  (0) 2008.12.14
by Anna 안나 2008. 12. 14. 19:32
provenance 참조

'JS > jquery' 카테고리의 다른 글

IE를 위해 코딩할때  (0) 2009.01.05
CSS Text Gradients  (0) 2009.01.04
jQuery 강좌 링크  (0) 2008.12.14
InnerFade with JQuery  (0) 2008.12.14
jQuery Corner Demo  (0) 2008.12.14
jQuery를 이용한 쇼핑카드 예제  (0) 2008.12.14
가볍고 쉬운 Ajax - jQuery 시작하기  (0) 2008.12.14
renderCalendar  (0) 2008.12.14
플러그인 소개 demo  (0) 2008.12.14
JQuery를 이용한 겸손한 탭 메뉴 구현  (0) 2008.11.16
by Anna 안나 2008. 12. 14. 19:31
jQuery를 활용한 쇼핑 카트 구현 예제 jQuery를 활용하여 쇼핑 카트를 만들어봤는데 재밌네요.
좀더 확장하면 쇼핑몰에 응용할 수 있는 수준이군요. 예제 링크 1. Draggables 1.1 Options: handle string or DOMElement optional the handel that starts the draggable revert boolean optional when true, on stop drag the element returns to initial position ghosting boolean optional when true a copy of the element is moved zIndex integer optional zIndex depth for the element while in drag opacity float ( < 1) optional opacity for the element while in drag grid mixed (integer or array) optional define a grid for draggable to snap to fx integer optional duration for the effect applied to the draggable containment string ('parent' or 'document') or array (left, top, width, height) optional define the zone where the draggable can be moved. Use value 'parent' to move it inside parent element, 'document' for not moving it outside the document, so no extra scroll. axis string ('vertically' or 'horizontally') optional define the axis which the dragged elements moves on onStart function optional callback function triggered when the dragging starts onStop function optional callback function triggered when the dragging stops onChange function optional callback function triggered when the dragging stops and elements was moved at least one pixel onDrag function optional callback function triggered while the element is dragged. Receives two parameters the x and y coordinates. You can return an object with new coordinates {x: new x, y: new y} so this way you can interact with the dragging process, build your containment for instance. insideParent boolean optional tell whatever the element is dragged inside its parent snapDistance integer optional the dragged element is not moved unless is moved more then snapDistance. This way you can prevent accidental dragging cursorAt object optional the dragged element is moved to the cursor position with the offset specified. Accepts value for top, left, right and bottom offset. autoSize boolean optional when true the drag helper is resized to its content, instead of the dragged element's sizes frameClass String optional When is set the cloned element is hidden so only a frame is dragged 1.2 사용된 샘플 소스 $('div.product').Draggable({revert: true, fx: 300, ghosting: true, opacity: 0.4});
2. Droppables 2.1 Options: accept string mandatory the class name for draggables to get accepted by the droppable activeclass string optional when an acceptable draggable is moved the droppable gets this class hoverclass string optional when an acceptable draggable is inside the droppable, the droppable dets this class tolerance 'pointer', 'intersect' or 'fit' optional points how the draggble must be against the droppable onDrop function optional when an accepted draggble is drop on a droppable this functin is called. Applies to the droppable and gets as parameter the draggable DOMElement onHover function optional called when an accepted draggble is hovering a droppable. Applies to the droppable and gets as parameter the draggable DOMElement onOut function optional called when an accepted draggble is leaving a droppable. Applies to the droppable and gets as parameter the draggable DOMElement 2.2 사용된 샘플 소스 $('#cart').Droppable(

{

accept : 'product',

activeclass: 'activeCart',

hoverclass: 'hoverCart',

tolerance: 'intersect',

onActivate: function(dragged)

{

if (!this.shakedFirstTime) {

$(this).Shake(3);

this.shakedFirstTime = true;

}

},

onDrop: addProductToCart

}

);
재밌네요. 좀 더 공부한다면 더 좋은 인터페이스, 더 많은 문제점을 알게 될 것 같네요. 아직은 모르는 부분이 많아서인지 기본 기능만 되어도 좋아 보이네요. jQuery 다시 보았어...^^

'JS > jquery' 카테고리의 다른 글

CSS Text Gradients  (0) 2009.01.04
jQuery 강좌 링크  (0) 2008.12.14
InnerFade with JQuery  (0) 2008.12.14
jQuery Corner Demo  (0) 2008.12.14
jQuery Treeview Plugin Demo  (0) 2008.12.14
가볍고 쉬운 Ajax - jQuery 시작하기  (0) 2008.12.14
renderCalendar  (0) 2008.12.14
플러그인 소개 demo  (0) 2008.12.14
JQuery를 이용한 겸손한 탭 메뉴 구현  (0) 2008.11.16
imgAreaSelect Examples  (0) 2008.11.15
by Anna 안나 2008. 12. 14. 19:30

시작 하기 전에 jQuery는 2006년 초에 John Resig가 개발한 자바스크립트 라이브러리 이다. 전체 라이브러리가 55kb밖에는 안되는 초 경량이면서도 누구나 쉽게 브라우져 기반의 자바스크립트 프로그래밍을 쉽게 할 수 있을 뿐더러, Ajax또한 쉽게 구현 할 수 가 있다. 또한 플러그인 방식의 확장을 지원하여, 현재 많은 수의 플러그인을 확보하고 있다. 나온지는 얼마 안되었지만 수백여개의 사이트가 사용할 만큼 안정적이며, 유명한 라이브러리 이다. 구지 비교하자면 prototype이라는 기존 유명 라이브러리와 비교가 가능하겠지만, 더욱 간단하며, 쉽다는것을 장점으로 꼽고 있다.(사실 본인은 prototype을 잘 모른다. 따라서 기존 개발자들의 의견을 빌린것이다. 어느것이 더 좋다는 표현이 아님을 알아달라) 무엇이 짧은 시간안에 jQuery를 유명하게 하였을까? 이런 호기심을 가지고 깊이 살펴본 결과 그 이유를 알 수 있었다. 작고, 쉽고, 그러나 강력하다는 것이 그 이유이다. 따라서 이런 본인의 경험을 공유하고자 이글을 올린다. 이 글은 jQuery의 튜토리얼문서를 기반으로하여 작성 되었다. 따라서 예제의 상당 부분은 동일하다, 단, 직접 프로그래밍을 통해 소스를 돌려보고 그 경험을 글로 올리는것이니 만큼 그냥 번역 보다는 더 나을 것으로 판단 한다. 참고로 이글에서 Ajax는 비동기 통신의 경우에만 국한 하겠다. 그 이유는 jQuery에서 Ajax라는 별도 네임스페이스로 라이브러리를 지원하기 때문이다. 자바스크립트 전용 IDE 소개 - Aptana 프로그래머들 중에는 IDE를 싫어하는 사람도 있다. 그러나 나는 없는것보다는 있는것이 더 낳다고 생각한다. 특히 한 언어를 위한 전용 환경을 지원할 경우는 더욱 그러하다. 브라우져 기반의 자바스크립트 프로그래밍을 하다보면 가장 어려운 점이 디버깅이다. printf디버거도 어려울 경우가 많다.(printf디버거는 디버깅을 위해 필요한 값을 출력하여 확인 하는 방법을 말한다.-본인이 만들어낸 용어이다.) 특히 브라우져의 경우는 로컬파일을 사용할 수 없어 화면을 이용한 값의 출력에 의존하여야 함으로 루프값을 출력할 경우는 거의 죽음이고, HTML태그를 생성하여 이곳에 이벤트를 결합하고, 코딩하는것을 반복하는 동적 HTML프로그래밍은 더욱 디버깅이 어렵다. 따라서 브라우져의 플러그인과 결합된 디버거를 사용하는것이 매우 도움이 된다. Firefox용 Firebug가 대표적인 것인데, 가장 많이 사용하는 디버거 이기도 하다. 그러나 편집기와 독립된 형태로 사용해야 함으로 수정 작업 시 불편함이 따른다. 이러한 점을 개선하려면 역시 디버거와 편집기를 포함하는 전용 IDE가 필요하다. 한가지더 이야기 하면, 기존 Eclipse와 같은 IDE에서 지원하는 Code Inspector기능의 필요를 들 수 있다. 사실 한 언어에 익숙한 사람이면 이 기능이 불편 하다. 매번 객체명뒤 점을 찍어 객체의 맴버를 보는 것은 그것을 아는 사람에게는 편집속도만 떨어뜨릴 뿐이다. 그러나 언어에 익숙치 않다거나, 남이 제공한 라이브러리를 사용할 경우는 이기능이 매우 유용하다. 특히 해당 맴버의 간단한 도움말까지 표시되면 API문서를 일일이 그때마다 검색하지 않아도 되어서 편리하다. 기존 자바 스크립트 편집기는 사실 이러한 기능이 부족한것이 사실 이었다. 그러나 지금 소개할 Aptana는 자바스크립트 전용 IDE를 표방한 몇 안되는 IDE중 하나이다. 이클립스 기반에 프러그인으로 개발되고 배포는 리치클라이언트와 플러그인 방식 모두를 지원한다. 따라서 기존 설치된 이클립스에서도 사용할 수 있고, 별도 설치를 통해 독립적인 IDE로 사용 할수도 있다. 다음은 Aptana의 실행 화면이다.


특히 Code Inspector가 매력 적이다. 노란 색으로 나오는 도움말도 매우 유용하다.
Apatana의 설치는 쉽다. 또한 무료로 사용 할 수 가 있다. (http://www.aptana.org/) 사용법은 기존 Eclipse와 동일하다. 단 디버거를 사용하려면 Firefox가 설치 되어 있어야 한다. 또한 기존 Ajax라이브러리들도 지원하는데, jQuery도 지원한다. 위 화면에서 객체의 도움말이 나올 수 있는것은 이 때문이다. 프로젝트 생성 시 jQuery프로젝트를 선택하여 생성 하면 된다. jQuery 사용 위에서 소개한 Aptana를 설치 하였다면, 별도 jQuery설치는 필요 없다. 하지만 설치가 어려운것은 아니다. jQuery라이브러리는 55kb짜리 파일 하나로 되어 있다. 이를 HTML에 사용 선언을 하여 주면 된다. <html>
<head>
<script type="text/javascript" src="path/jquery.js"></script>
<script type="text/javascript">
// Your code goes here
</script>
</head>
<body>
<a href="http://jquery.com/">jQuery</a>
</body>
</html> 기존 자바 스크립트 라이브러리 사용과 차이가 없다. 단, 압축버젼과 그렇지 않은 버젼 두개의 파일을 제공하는데, 프로그래밍을 할 때는 디버깅을 위해 압축하지 않은 버젼의 파일을 사용하고, 배포할 경우 압축된 버젼을 사용하는 것이 좋다. jQuery 의 시작 이벤트 보통의 자바스크립트 프로그래머들은 브라우져의 document가 모두 다운로드 되어진 상태에서 코드를 시작하기위해 다음과 같은 이벤트에 스크립트 코드를 넣는다. window.onload = function(){ ... } 그러나 이 경우 이미지 까지 다운로드가 모두 완료 된 후 이벤트가 호출되기 때문에, 큰이미지의 경우 실행속도가 늦은 것처럼 사용자에게 보일 수 있다. 따라서 jQuery는 이러한 문제를 해결하기위해 다음과 같은 이벤트를 제공한다. $(document).ready(function(){
// 이곳에 코드를 넣으면 된다.
}); 이 이벤트는 브라우져의 document(DOM)객체가 준비가 되면 호출이 된다. 따라서 이미지 다운로드에 의한 지연이 없다. 위 코드는 다음과 같이 생략하여 사용 가능하다. $(function() { // run this when the HTML is done downloading }); 사용자 이벤트 처리 - 클릭이벤트의 예 특정 태그를 클릭 했을경우 이벤트의 처리를 jQuery에서 어떻게 처리 하는지를 살펴 보자. 다음은 위 HTML예제의 앵커(a)태그 클릭 시 이벤트를 처리하는 코드 이다. $("a").click(function(){
alert("Thanks for visiting!");
}); jQuery에서 이벤트 처리는 콜백함수를 통해 수행된다. 이코드는 HTML에 있는 모든 앵커 태그의 클릭 시 ?업창을 통해 메시지를 출력해 준다. 코드를 보면 $()로된 문법을 볼 수 있을 것이다. 이것은 jQuery의 셀렉터 이다. $("a")가 의미하는 것은 HTML(브라우져의 DOM)에서 앵커태그 모두를 의미한다. 이후 .click()메소드는 이벤트 메소드로서 이곳에 콜백함수를 파라메타로 넣어 이벤트 처리를 수행 하는것이다. 함수는 위에서 처럼 익명(function(){...})이나 선언된 함수 모두를 사용할 수 있다. jQuery의 셀렉터 $()로 시작하는 셀렉터를 좀더 살펴보자. jQuery는 HTML, DOM객체등을 CSS나 XPATH의 쿼리방법과 동일한 방법으로 선택 한다. 앞선 예처럼 문자열로 특정 태그를 선택하는 것은 CSS를 작성해 본 프로그래머라면 익숙할 것이다. 이와 같은 방법 외에도 다음과 같이 태그의 id를 통해 선택 할 수 있다. $(document).ready(function() {
$("#orderedlist").addClass("red");
}); 위 코드는 id가 orderedlist인 태그에 red라는 CSS 클래스를 할당하는 코드 이다. 만약 이태그가 하위 태그를 가지고 있다면 다음과 같이 선택 할 수 있다. $(document).ready(function() {
$("#orderedlist > li").addClass("blue");
}); 이코드는 id가 orderedlist인 태그의 하위 태그 중 <li> 태그 모두에 blue라는 CSS 클래스를 할당하는 코드 이다. 이코드는 jQuery메소드를 이용 다음과 같이 바꾸어 사용 할 수도 있다. $(document).ready(function() {
$("#orderedlist").find("li").each(function(i) {
$(this).addClass("blue");
});
}); 한가지 다른 점은 모든 태그에 동일하게 CSS 클래스를 적용하는 방식이 아닌 개별 태그를 선택하여 적용할 수 있다는 것이다. XPath를 사용하는 예를 다음과 같은 것을 들 수 있다 //절대 경로를 사용하는 경우 $("/html/body//p")
$("/*/body//p")
$("//p/../div") //상대경로를 사용하는 경우 $("a",this)
$("p/a",this) 다음과 같이 두 방식을 혼용하여 사용 할 수도 있다. //HTML내 모든 <p>태그중 클래스속성이 foo인 것 중 내부에 <a> 태그를 가지고 있는것 $("p.foo[a]"); //모든 <li>태그 중 Register라는 택스트가 들어있는 <a> 태그 $("li[a:contains('Register')]"); //모든 <input>태그 중 name속성이 bar인 것의 값 $("input[@name=bar]").val(); 이외에도 jQuery는 CSS 3.0 표준을 따르고 있어 기존 보다 더많은 쿼리 방법을 지원하고 있다. 자세한것은 jQuery의 API 설명을 참고 하라(http://docs.jquery.com/Selectors) Chainability jQuery는 코드의 양을 줄이기 위해 특별한 기능을 제공한다. 다음 코드를 보자 $("a").addClass("test").show().html("foo"); <a>태그에 test라는 CSS 클래스를 할당한다. 그후 태그를 보이면서 그안에 foo라는 텍스트를 넣는다. 이런 문법이 가능한 이유는 $(), addClass(), show()함수 모두가 <a>태그에 해당하는 객체를 결과로 리턴해주면 된다. 이를 Chainability라 한다. 좀더 복잡한 경우를 보자 $("a")
.filter(".clickme")
.click(function(){
alert("You are now leaving the site.");
})
.end()
.filter(".hideme")
.click(function(){
$(this).hide();
return false;
})
.end(); // 대상 HTML이다 <a href="http://google.com/" class="clickme">I give a message when you leave</a>
<a href="http://yahoo.com/" class="hideme">Click me to hide!</a>
<a href="http://microsoft.com/">I'm a normal link</a> 중간에 end()함수는 filter()함수로 선택된 객체를 체인에서 끝는 역할을 한다. 위에서는 clickme클래스의 <a>태그 객체를 끊고 hideme를 선택하는 예이다. 또한 this는 선택된 태그 객체를 말한다. 이런 Chainability를 지원 하는 jQuery메소드들에는 다음과 같은 것들이 있다. add() children() eq() filter() gt() lt() next() not() parent() parents() sibling() Callbacks 위에서 click()이벤트를 콜백함수를 통해처리하는 코드를 살펴 보았다. 콜백함수는 기존 자바나 .NET의 그것과 같다. 다음 코드를 보자 $.get('myhtmlpage.html', myCallBack); 먼저 $.get()은 서버로 부터 HTML(또는 HTML 조각)을 가져오는 함수 이다. 여기서 myCallBack함수는 전송이 완료 되면 호출되는 콜백 함수 이다. 물론 앞선 예의 click()이벤트 콜백처럼 익명함수 function(){}을 사용 해도 된다. 그러나 이와 같이 미리 선언된 함수를 콜백으로 사용할 경우 파라메타의 전달 방법은 좀 다르다. 흔히 다음과 같이 하면 될것이라 생각할 것이다. $.get('myhtmlpage.html', myCallBack(param1, param2)); 그러나 위와 같은것은 자바스크립트의 클로져(closure)사용에 위배가 된다. 클로져는 변수화 될수 있는 코드 블록을 이야기한다. 즉 스트링변수와 같이 파라메타로 전달될 수 있지만, 실행가능한 함수 인 것이다. 일반적으로 함수를 ()제외하고 이름만을 사용하면 클로져가 된다. 위의경우 $get()함수의 파라메타로 전달된 myCallBack함수는 클로져로 전달된것이 아닌 myCallBack()를 실행한 결과 값이 전달 된다. 따라서 다음과 같이 코드를 작성하여야 한다. $.get('myhtmlpage.html', function(){
myCallBack(param1, param2);
}); 만약 선언된 함수가 아닌 익명함수를 콜백으로 사용할경우는 다음과 같이 하면 된다. $.get('myhtmlpage.html', function(param1, param2){
//이곳에 코드를 넣는다.
}); jQuery 의 애니메이션 HTML의 태그를 사라지고 나타내게 하거나, 늘리고 줄이고, 이동시키는 애니매이션 동작은 많이 사용하는 기는 중 하나이다. jQuery는 다양안 애니메이션 기능을 메소드를 통해 제공한다. 다음 코드를 보자 $(document).ready(function(){
$("a").toggle(function(){
$(".stuff").hide('slow');
},function(){
$(".stuff").show('fast');
});
}); 이코드는 <a>태그중 stuff클래스가 할당된것을 토글로 느리게 감추고, 빨리 보이게 하는 함수 이다. 다음은 animate()메소드를 이용하여 여러 애니메이션을 합쳐 실행하는 예이다. $(document).ready(function(){
$("a").toggle(function(){
$(".stuff").animate({ height: 'hide', opacity: 'hide' }, 'slow');
},function(){
$(".stuff").animate({ height: 'show', opacity: 'show' }, 'slow');
});
}); 위 코드는 높이와 투명도를 동시에 천천히 사라지고, 나타나게 하는 코드 이다. jQuery에서의 Ajax Ajax는 서버와의 비동기 통신을 말한다. 일반적으로 Ajax하면 요즘은 자바스크립트를 이용한 브라우져의 동적 DOM의 처리, 즉 DHTML, CSS등을 포함하지만, jQuery에서는 Ajax라는 네임스페이스를 통해 비동기 서버 통신을 하는것을 말한다.먼저 다음 예를 보자 $.ajax({
type: "GET",
url: "test.js",
dataType: "script"
}) 이 예는 GET방식으로 서버에서 자바스크립트를 로딩하고 실행하는 코드 이다. 다음 예를 보자 $.ajax({
type: "POST",
url: "some.php",
data: "name=John&location=Boston",
success: function(msg){
alert( "Data Saved: " + msg );
}
}); 이는 서버로 부터 POST방식으로 파라메터를 주어 데이터를 가져온 후 이를 success콜백을 이용해 처리하는 코드이다. 아마 Ajax에서 가장 많이 사용하는 코드일 것이다. success말고도 $.ajax()함수는 다양한 옵션을 제공한다. 자세한 내용은 API설명을 참조하라 (http://docs.jquery.com/Ajax) 다음 예는 이 옵션 중 async(비동기)방식을 사용할지 아닐지를 사용한 코드이다. var html = $.ajax({
url: "some.php",
async: false
}).responseText; 맺으며... 지금까지 jQuery에 대해 간단히 살펴 보았다. 혹자는 Dojo나 Extjs와 같이 버튼, 그리드등의 위젯이 지원되지 않는다고 실망할 것이다.그러나 jQuery는 Plugin을 지원한다. 이중 Interface와 같은 플러그인은 그 완성도가 매우 높다. 이것 말고도 수백개의 플러그인들이 홈페이지를 통해 공개 되어 있다.(http://docs.jquery.com/Plugins) 하지만 내 경험상으로 그리드와 같은 복잡한 위젯이 아니더라도 자바스크립크를 이용한 동적인 홈페이지와 Ajax를 통한 비통기 통신만으로도 대부분의 고객 요구와 문제를 해결 할 수 있다. 실제로 jQuery는 MSNBC와 같은 유명한 많은 사이트에서 사용되고 있다.(http://docs.jquery.com/Sites_Using_jQuery) 따라서 어떤 서비스를 제공하느냐에 따라 필요한 위젯을 플러그인을 사용하거나 직접 개발하여 사용하는것이 더 나은 전략이라 생각한다. 사실 미리 만들어진 위젯도 나에게 맞추어 사용하기 위해서는 그래픽, CSS등 많은 부분을 손 대야 한다. 차라리 기본 원리를 알고 이를 확장하는 것이 좀더 전문적이고 어려운 문제를 해결 할 수 있는 길이라 생각 한다. 시간이 허락 한다면 꾸준히 jQuery의 개발 경험을 공유 하고 싶은 마음 이다.

'JS > jquery' 카테고리의 다른 글

jQuery 강좌 링크  (0) 2008.12.14
InnerFade with JQuery  (0) 2008.12.14
jQuery Corner Demo  (0) 2008.12.14
jQuery Treeview Plugin Demo  (0) 2008.12.14
jQuery를 이용한 쇼핑카드 예제  (0) 2008.12.14
renderCalendar  (0) 2008.12.14
플러그인 소개 demo  (0) 2008.12.14
JQuery를 이용한 겸손한 탭 메뉴 구현  (0) 2008.11.16
imgAreaSelect Examples  (0) 2008.11.15
JQuery 기초예제  (0) 2008.11.15
by Anna 안나 2008. 12. 14. 19:23
Page sourcecode $(function()
{
// update the firstDayOfWeek when the day of week select changes
$('#dow').bind(
'change',
function()
{
Date.firstDayOfWeek = Number(this.options[this.selectedIndex].value);
}
);
// when the choose date form is submitted grab the chosen month and year
// from the select elements and call renderCalendar...
$('#chooseDateForm').bind(
'submit',
function()
{
var month = Number(this.month.options[this.month.selectedIndex].value);
var year = Number(this.year.options[this.year.selectedIndex].value);

$('#calendar-me').renderCalendar({month:month, year:year});

return false;
}
);
});

'JS > jquery' 카테고리의 다른 글

InnerFade with JQuery  (0) 2008.12.14
jQuery Corner Demo  (0) 2008.12.14
jQuery Treeview Plugin Demo  (0) 2008.12.14
jQuery를 이용한 쇼핑카드 예제  (0) 2008.12.14
가볍고 쉬운 Ajax - jQuery 시작하기  (0) 2008.12.14
플러그인 소개 demo  (0) 2008.12.14
JQuery를 이용한 겸손한 탭 메뉴 구현  (0) 2008.11.16
imgAreaSelect Examples  (0) 2008.11.15
JQuery 기초예제  (0) 2008.11.15
jQuery-프로토타입, jQuery에서 간단히 충돌 피하기  (0) 2008.11.15
by Anna 안나 2008. 12. 14. 19:22
테이블에 대한 플러그인 demo http://motherrussia.polyester.se/docs/tablesorter/ 정렬기능만 http://p.sohei.org/stuff/jquery/columnmanager/demo/demo.html colum을 안보이게 할수 있음 http://ptdateselect.sourceforge.net/example/sample001.html 선택하여 수정가능 http://makoomba.altervista.org/grid/ 보기만 가능(마우스 갖다대면 색 변화) http://ideamill.synaptrixgroup.com/jquery/tablefilter/tabletest.htm 필터기능 http://www.webtoolkit.info/demo/jquery/scrollable/demo.html 그리드에 스크롤바 http://projects.arkanis-development.de/table_navigation/example.html 다른페이지 링크 http://www.dyve.net/jquery/?editable 수정가능 Multi-Column Client-Sortable Dropdown Select Box 페이지가 리스트로 페이지 또는 메뉴에 대한 플러그인 http://stilbuero.de/jquery/tabs/#fragment-29 tag http://rikrikrik.com/jquery/pager/#download *페이지 처리 http://jdsharp.us/jQuery/plugins/jdMenu/1.3.beta2/jdMenu-demo.html 체크박스 http://jquery.bassistance.de/validate/demo-test/radio-checkbox-select-demo.html http://labs.freakdev.com/jquery/fCheck/pizza.php http://kawika.org/jquery/checkbox/ 폼 http://www.lexcat.ro/nicejforms/nicejforms.html http://jquery.bassistance.de/validate/demo-test/ 회원등록 http://jquery.bassistance.de/validate/demo-test/errorcontainer-demo.html 로그인,파일첨부 http://jquery.bassistance.de/validate/demo-test/ajaxSubmit-intergration-demo.html 로그인 유효성 검사 http://jquery.bassistance.de/validate/demo-test/custom-methods-demo.html 필드 유효성 검사 http://www.studioindustryllc.com/icontact.html Security Code 달력 http://marcgrabanski.com/code/jquery-calendar/ http://kelvinluck.com/assets/jquery/datePicker/v2/demo/ http://pttimeselect.sourceforge.net/example/index.html timeselect 미디어 http://jquery.lukelutman.com/plugins/flash/example-basic.html flash 넣기 http://www.sean-o.com/jquery/jmp3/ mp3 파일넣기 http://malsup.com/jquery/media/video.html 미디어 박스 창 띄우기 http://jquery.com/demo/thickbox/ http://www.aspstat.com/jbox/demo.htm 박스 창띄기기(크기조절가능) http://dev.iceburg.net/jquery/jqModal/ 화면 waiting http://malsup.com/jquery/block/#page 스크롤바 http://kelvinluck.com/assets/jquery/jScrollPane/jScrollPane.html 문서보기 http://malsup.com/jquery/media/misc.html 플래쉬효과 http://medienfreunde.com/lab/innerfade/#n2 tip http://www.codylindley.com/blogstuff/js/jtip/, http://edgarverle.com/BetterTip/default.cfm http://www.dave-cohen.com/node/1186 http://jquery.bassistance.de/tooltip/ icon http://icon.cat/software/iconDock/ 구글 지도 http://www.dyve.net/jquery/?googlemaps http://projects.sevir.org/storage/jqmaps/index.html 기타 color선택 http://www.wanderinghorse.net/computing/javascript/jquery/colorpicker/demo-colorpicker.html text에 highlightFade http://jquery.offput.ca/highlightFade/ 박스 resize http://dev.iceburg.net/jquery/jqDnR/ 박스 애니메이션 http://dev.jquery.com/~paul/plugins/animateClass/
by Anna 안나 2008. 12. 14. 19:21
| 1 2 |